Welcome to the help and support hub for
OSIRT iii. Whether you are
starting your first investigation or you are an experienced user
managing complex digital evidence, this page will guide you
through each feature and workflow step by step.
You will find clear and practical instructions along with context
and best-practice tips, covering everything from installation and
case creation to capturing screenshots, video, mobile logs, and
exporting reports that are ready for court.
Browse by topic, search for keywords, or start at the beginning.
Whatever you choose, you are in the right place to make the most
of the
OSIRT iii investigation toolkit.
Click the button or visit
osirt.co.uk/download
to download the latest version of OSIRT iii.
Run the Installer
Locate the downloaded .exe file
and double-click it.
If prompted by Windows SmartScreen, click
More info → Run anyway.
Follow the installation wizard prompts to complete setup:
Choose an installation location (default is fine for most
users).
Click Install and wait for the process to
complete.
Finish Installation
Once installation is complete, you may launch OSIRT iii
immediately by checking
"Launch OSIRT iii" or using the desktop/start
menu shortcut.
First Run
Allow Localhost Connection
On first launch, OSIRT iii will start a local server
(localhost) to enable its link to the browser extension.
Windows Defender Firewall or other
antivirus software may prompt you to allow the connection.
Make sure to Allow access when
prompted (usually a Windows Security dialog).
This is required for full functionality—blocking it
will prevent the extension from working correctly.
Note: The first run of OSIRT iii after
installation can take a short while (up to 30 seconds) to
load up.
Installation (macOS)
Installing OSIRT iii on macOS
is simple. The application is distributed as a
.dmg file and has completed
Apple’s full notarization process, meaning it
has been verified by Apple and is safe to run.
When you first open the application, macOS will request several
permissions. These are expected and required for OSIRT iii to
capture evidence, record screen activity, and save files
correctly.
On first launch, macOS may display a warning — click
Open to continue.
You only need to install the application once. After this, you
can launch it normally from Applications or Launchpad.
First-run permissions
The first time OSIRT iii runs, macOS will ask for several
permissions. These prompts may appear one after another.
These permissions allow OSIRT iii to:
Capture screenshots and screen recordings
Access files for case storage and export
Communicate with local services and extensions
Important: If you click
Don’t Allow, features may not work until the
permission is manually enabled later.
Local Network Access
macOS may display a prompt similar to: “Allow ‘Electron’ to
find devices on local networks?”
This appears because the
OSIRT iii Desktop Client
communicates with the OSIRT browser extension via
localhost (your own machine). macOS
classifies this as local network access, even though no
external network communication is taking place.
Why this is required:
Enables communication between the desktop client and browser
extension
Supports capture of webpages, URLs, and browser-based
artefacts
Allows seamless evidence collection workflows
What to do: Click Allow.
File Access (Desktop / Documents)
macOS may display prompts such as: “OSIRT iii would like to
access files in your Desktop folder”
This permission allows the
OSIRT iii Desktop Client to read and write
files in protected locations such as Desktop,
Documents, and Downloads.
Why this is required:
OSIRT stores case data and artefacts locally
Allows importing and exporting evidence
Enables saving and opening case files from common locations
What to do: Click Allow.
Without this permission, OSIRT iii may not be able to read or
save files in protected folders.
Allow Screen Recording
macOS will request permission for screen recording when using
capture features.
Why this is required:
Screen recording and screenshots
Region capture functionality
Video evidence collection
When prompted, click Open System Settings.
Go to Privacy & Security.
Select Screen & System Audio Recording.
Enable OSIRT iii Desktop Client.
Close and reopen OSIRT iii.
Important: Screen capture will not work until
this is enabled and the application is restarted.
Allow Direct Screen Access
macOS may display a prompt explaining that OSIRT iii wants to
bypass the system window picker and directly access your
screen and audio.
Why this is required:
Allows direct screen and audio capture
Improves performance and usability during investigations
Ensures accurate evidence capture without interruptions
Click Allow to enable reliable screen capture
without needing to select a window each time.
Only visible on-screen content is captured, and this
permission should be used in accordance with your
organisation’s policies.
Finish Installation
Once all permissions are granted:
Restart OSIRT iii if prompted
Allow a few moments for initial setup
OSIRT iii is now ready to use. You can begin creating cases,
capturing screenshots, and recording evidence.
Important Notes
All permissions are requested by macOS, not OSIRT iii
directly
Permissions can be changed at any time in
System Settings → Privacy & Security
No data is transmitted externally unless explicitly
initiated by the user
Localhost communication is used only between the OSIRT
desktop client and browser extension
macOS Troubleshooting
Most issues on macOS are caused by missing permissions or system
security settings. Follow the guidance below to diagnose and
resolve common problems.
Quick check (fixes most issues)
Restart OSIRT iii after granting permissions
Check Screen Recording is enabled
Check Local Network access is enabled
Ensure OSIRT iii is in Applications (not running from DMG)
Screen recording or screenshots not working
Cause: Screen Recording permission is not
enabled.
Open System Settings
Go to Privacy & Security
Select Screen & System Audio Recording
Enable OSIRT iii Desktop Client
Close and reopen OSIRT iii
macOS requires the application to be restarted before this
permission takes effect.
You clicked “Don’t Allow” during setup
macOS does not re-prompt automatically if a permission is
denied.
Fix: Enable permissions manually:
System Settings → Privacy & Security
Open the relevant section (e.g. Screen Recording, Files
& Folders)
Enable OSIRT iii
“OSIRT iii cannot be opened” or app is blocked
Cause: macOS Gatekeeper blocking first
launch.
Fix:
Open System Settings
Go to Privacy & Security
Scroll down to the security section
Click Open Anyway
You may also be able to right-click the app and select
Open.
App behaves strangely or permissions reset
Cause: Running the app directly from the
.dmg.
Fix:
Drag OSIRT iii into Applications
Launch it from Applications only
Running from the DMG can prevent permissions from being stored
correctly.
Extension not connecting or features failing
Cause: Local Network permission not enabled.
System Settings → Privacy & Security → Local Network
Enable OSIRT iii (Electron)
Restart OSIRT iii after enabling.
Cannot access Desktop, Documents, or files
Cause: File access permissions not granted.
System Settings → Privacy & Security
Open Files and Folders
Enable access for OSIRT iii
Permission does not appear in System Settings
macOS only shows permissions after an app has requested them.
Fix:
Open OSIRT iii and trigger the feature (e.g. screenshot)
macOS will then show the permission
Resetting permissions (advanced)
If permissions are inconsistent or not working:
Close OSIRT iii
Disable all OSIRT iii permissions in System Settings
Restart your Mac
Reopen OSIRT iii and re-enable permissions
Restarting macOS fully resets permission states and resolves
most edge cases.
After installing, pin the extension to your browser toolbar and
ensure the
OSIRT iii Desktop Client is running so the
extension can connect and send captured material into your
casebook.
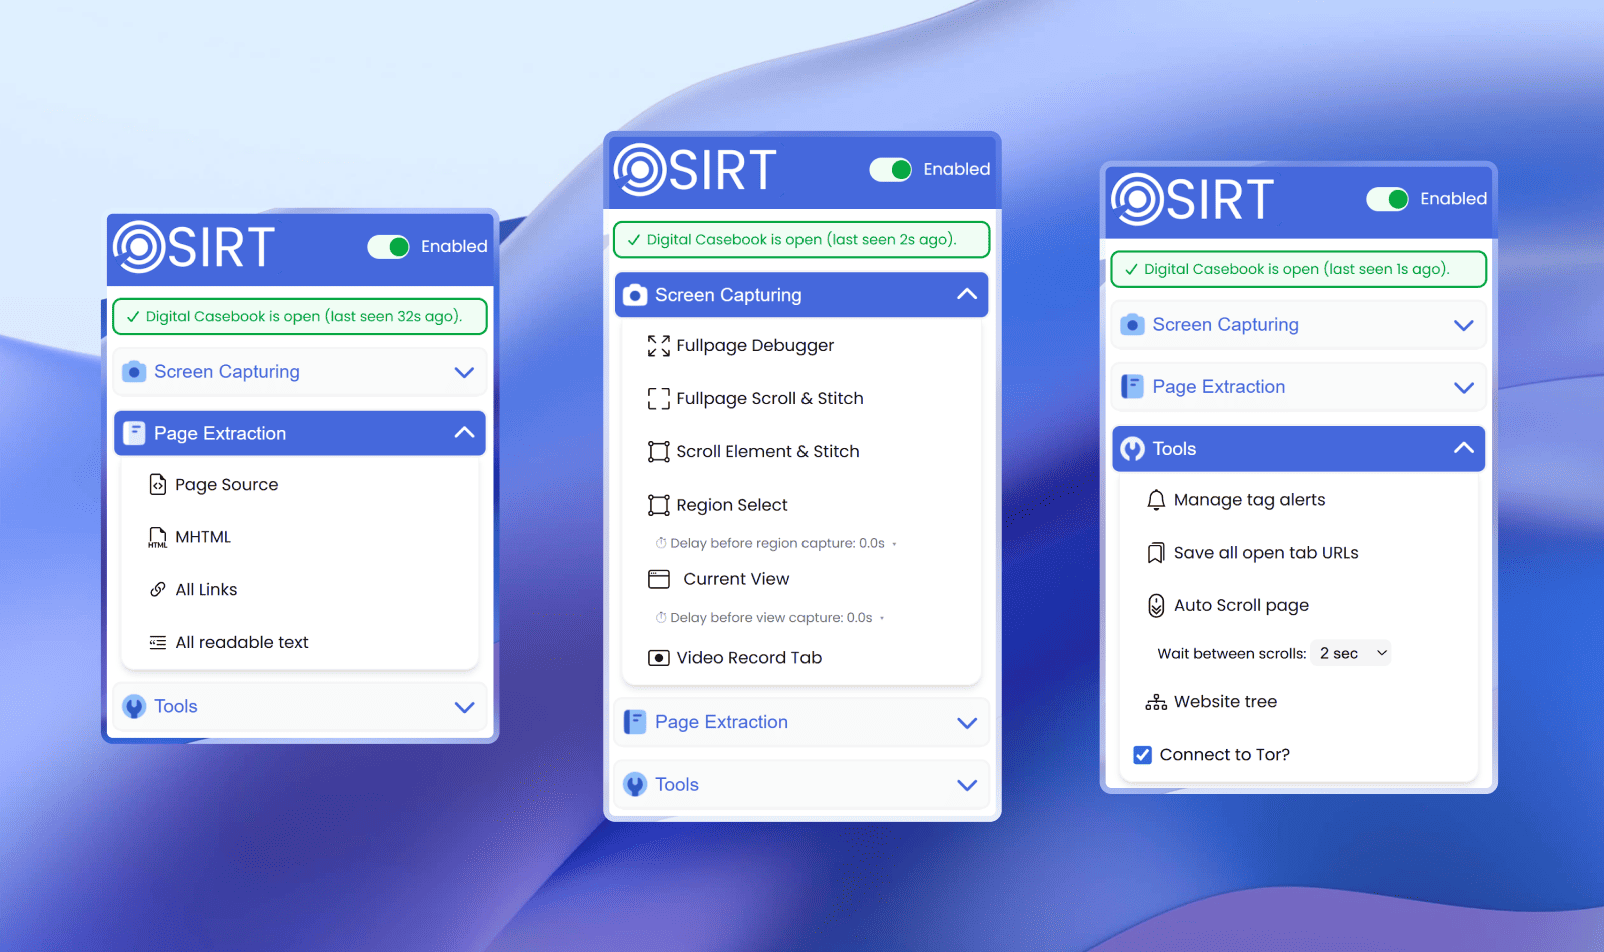
When you first launch OSIRT iii, you’ll see the Home Screen, which
acts as your starting point for any digital investigation.
Example: OSIRT iii Home Screen
It provides two main options:
Create New Case
Clicking this button allows you to begin a fresh case. You’ll
be asked to provide case details such as the name, location,
officer and agency names, and any relevant notes. This ensures
all artefacts you collect later are properly attributed and
organised from the outset.
Load Existing Case
If you've already worked on a case and want to continue, use
this button to open a previously saved
.osrx case file. OSIRT iii will
extract and restore all associated artefacts, logs, and
metadata, allowing you to pick up right where you left off.
Creating a New Case
To begin a new investigation, click
Create New Case from the OSIRT iii home screen.
This opens the case creation screen, where you set up the investigation
workspace, core metadata, save location, notes, and any optional custom
fields.
Investigation Details
The left side of the form records who is responsible for the investigation
and any optional reference information.
Field
Required?
Description
Investigating Officer
Required
The officer, investigator, or user creating the case.
Investigating Agency
Required
The organisation, department, or agency responsible for the case.
Operation Name
Optional
An optional operation name, investigation name, or internal project
title.
Evidence Reference
Optional
Any evidence number, exhibit reference, legal reference, or tracking
ID linked to the investigation.
Case Setup
The right side of the form controls the case name, where the case will be
stored, and the initial case notes.
Field
Required?
Description
Case Name
Required
The folder-safe name for your case. This becomes the case folder
name and should be clear, unique, and easy to recognise.
Case Save Location
Required
The location where the OSIRT iii case folder will be created. Use
Browse to choose a folder on your device.
Notes
Required
Initial case notes, such as the purpose of the investigation,
opening context, or setup remarks.
Folder name rules: The case name must be valid for your
operating system. Avoid characters such as
< > : " / \ | ? *.
Custom Fields
The Custom Fields area lets you add optional
case-specific metadata. Depending on your version of OSIRT iii, you can
add up to five custom fields.
These are useful for information that does not fit into the standard case
fields, such as:
Suspect ID
Operation code
Exhibit group
Internal reference
Team, unit, or review category
Tip: Custom fields are best used for consistent metadata
that your team expects to see across similar investigations.
Creating the case
Complete the required fields.
Check that the case save location is correct.
Add any optional references or custom fields you need.
When ready, click Create New Case.
If you do not want to continue, click Cancel to return
without creating a case.
Behind the scenes, OSIRT iii:
• Creates a structured case folder for artefacts and reports
• Initialises a secure SQLite database for storing case data
• Saves your case metadata and initial notes
• Prepares the dashboard so evidence collection can begin
After creation, OSIRT iii opens the
main dashboard, where you can begin collecting digital
artefacts such as screenshots, web captures, downloads, recordings, notes,
and other evidence.
Pro Tip:
Use a short, consistent case naming format. For example:
operation-name_subject_date. This makes case
folders easier to identify later.
Case Folder Structure
Custom Icon: Each case folder uses a
distinctive icon featuring “Detective Joe Sirt” to make your
case files instantly recognisable in Windows Explorer.
The icon is defined by a folderIcon.ico file inside each case
folder. You’ll see this icon automatically applied when browsing
folders in File Explorer (Windows).
Folder Structure Overview
Each case folder includes the following subdirectories and
files:
📁 Item
Description
attachments/
Stores any external files you import or drag-and-drop
into the case
downloads/
Contains files captured through the download feature
images/
Holds screenshots, snips, and full-page captures
reports/
Where reports and printed artefacts are generated and
stored
videos/
Contains screen recordings or captured video evidence
case.db
The SQLite database that stores all structured case data
folderIcon.ico
The custom icon file applied to the case folder
(Detective Joe Sirt)
Main Dashboard Overview
Once a case is created or loaded, OSIRT iii transitions you into
the
Main Dashboard— this is your digital casebook,
where all investigative work is centralised and easily accessible.
The dashboard is neatly laid out into the following key sections:
Investigation Details (Top Left)
Displays high-level case metadata:
• Officer & Agency:
The assigned investigator and their organisation.
• Case Reference:
The assigned investigator and their organisation.
• Timestamp:
When the case was created or loaded.
Click Show More to expand additional case
fields like operation name, evidence reference, hash type, and
any notes you've entered.
Live Detections
This area will display any detection flags or notifications related
to suspicious or notable content collected during your
investigation. If there are no detections, it will simply show
"No new alerts".
Status Indicator
Shows whether the OSIRT browser extension is
connected.
Green means
connected and ready to receive data from the web.
Red means
disconnected — which may prevent live captures from
functioning.
Capture Count
Displays a running total of all artefacts captured during the
case (screenshots, downloads, logs, etc.). This counter
increases automatically as you work.
Artefact Tabs (Just Below the Top Panel)
Item
Description
Captures
Screenshots, mhtml files, full-page grabs, and other
webpage artefacts.
Complete log
A chronological log of all actions taken, including when
the case was created, saved, opened, and each artefact
added.
Screen recordings
Any screen activity you've recorded using the built-in
recorder.
Websites visited
Logs and cards for every website recorded during the
session.
Each tab is interactive and displays artefacts as “cards” —
which you can click for more information or export later.
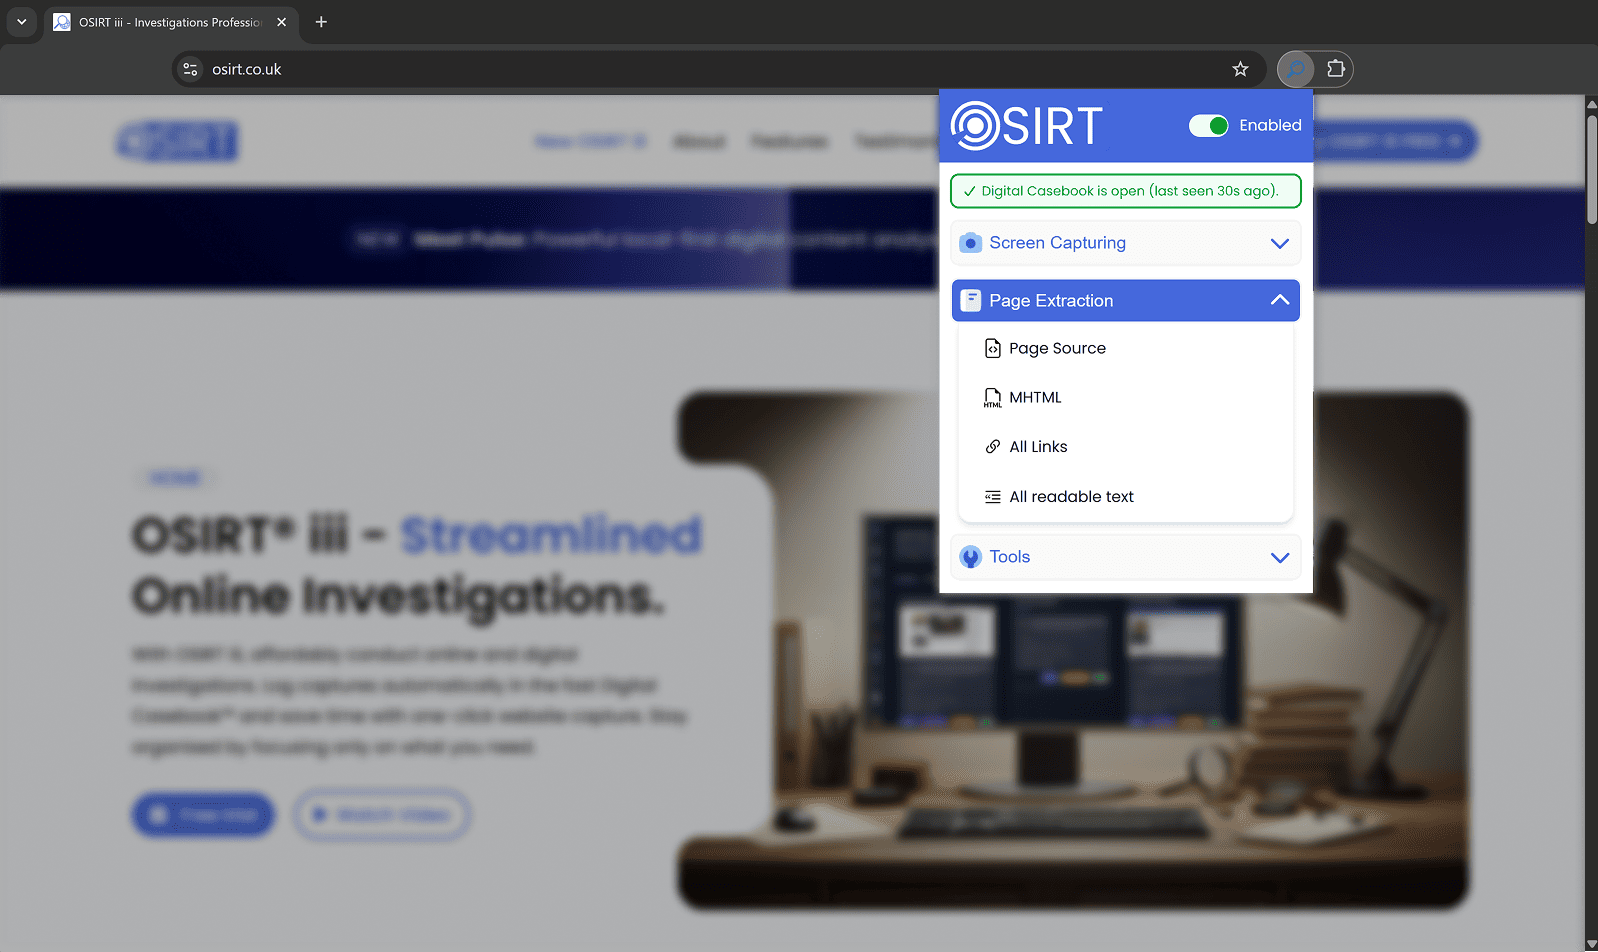
Left-Hand Toolbar (Navigation Panel)
This vertical menu gives you fast access to OSIRT iii’s tools:
🔎
Search
📱
mOSIRT
📥
Video Download
🌐
Webpage Download
📸
Screenshot
🎥
Screen recording
✂️
Snippet
📄
Export Report
🕵️
Dark Web Capture
This means you’re never more than one click away from capturing
or importing evidence.
This dashboard is designed to give you a complete view of the
investigation — from administrative details to real-time
evidence collection — all in one secure interface.
Navigation Panel Breakdown
Taking a Screenshot
The Screenshot tool is one of the most frequently used features in
OSIRT iii, allowing you to
quickly capture visual evidence from any screen connected to your
system.
To access it, simply click the camera icon on the left-hand
navigation bar labelled
“Screenshot”. This opens a
slide-out panel on the right-hand side of the screen with the
following options:
Select a Screen
Use the dropdown menu to choose which monitor or screen you
want to capture. If you have more than one screen connected,
they’ll appear as “Screen 1”,
“Screen 2”, etc. A small live
preview thumbnail will appear below to help confirm the
correct screen is selected.
Delay Before Screenshot
Use the slider to set a delay timer (in seconds) before the
screenshot is taken. This is especially helpful if you need to
arrange your desktop or hover over a menu before capturing.
Take Screenshot Button
When ready, press the
“Take Screenshot” button.
What happens when you take a screenshot
Capture the full visible screen
Automatically store the image within your active case folder
Calculate a SHA-512 hash to
ensure authenticity
Log the capture time and metadata in the case log
Captured screenshots will then appear in the
“Captures” tab, clearly marked
and timestamped.
Pro
Tip:
For clearer evidence, close unnecessary windows first and set a
brief delay (2–5 seconds) to position your cursor or open any
dropdowns you need to include.
Region Snippet Tool
The Snippet feature lets you capture a specific rectangular
portion of your screen — perfect for isolating relevant parts of a
webpage, chat, image, or video without saving the full screen.
To access the tool, click the red scissors icon on the left
navigation bar labelled “Snippet”. When activated, your screen
will dim and a red dashed selection box appears, which you can
move and resize to highlight the area you want to capture.
Control Bar Options
At the bottom of the screen, you'll see a small control bar with
the following options:
Capture: Click this to take the screenshot of the selected
area. The image will be automatically saved into your case and
recorded in the log.
Cancel: Exits the tool without capturing anything.
Enable Click-Through: Allows you to interact with content
(e.g., open dropdowns or right-click menus) beneath the
selection box before capturing.
Delay: Set a timer (in seconds) before the capture is taken.
This gives you time to prepare the area, such as opening
tooltips or hovering over content.
Captured snippets are treated the same as full screenshots —
complete with hash validation, timestamp, and file logging.
This tool is ideal for focused evidence gathering when only a part
of the screen is relevant.
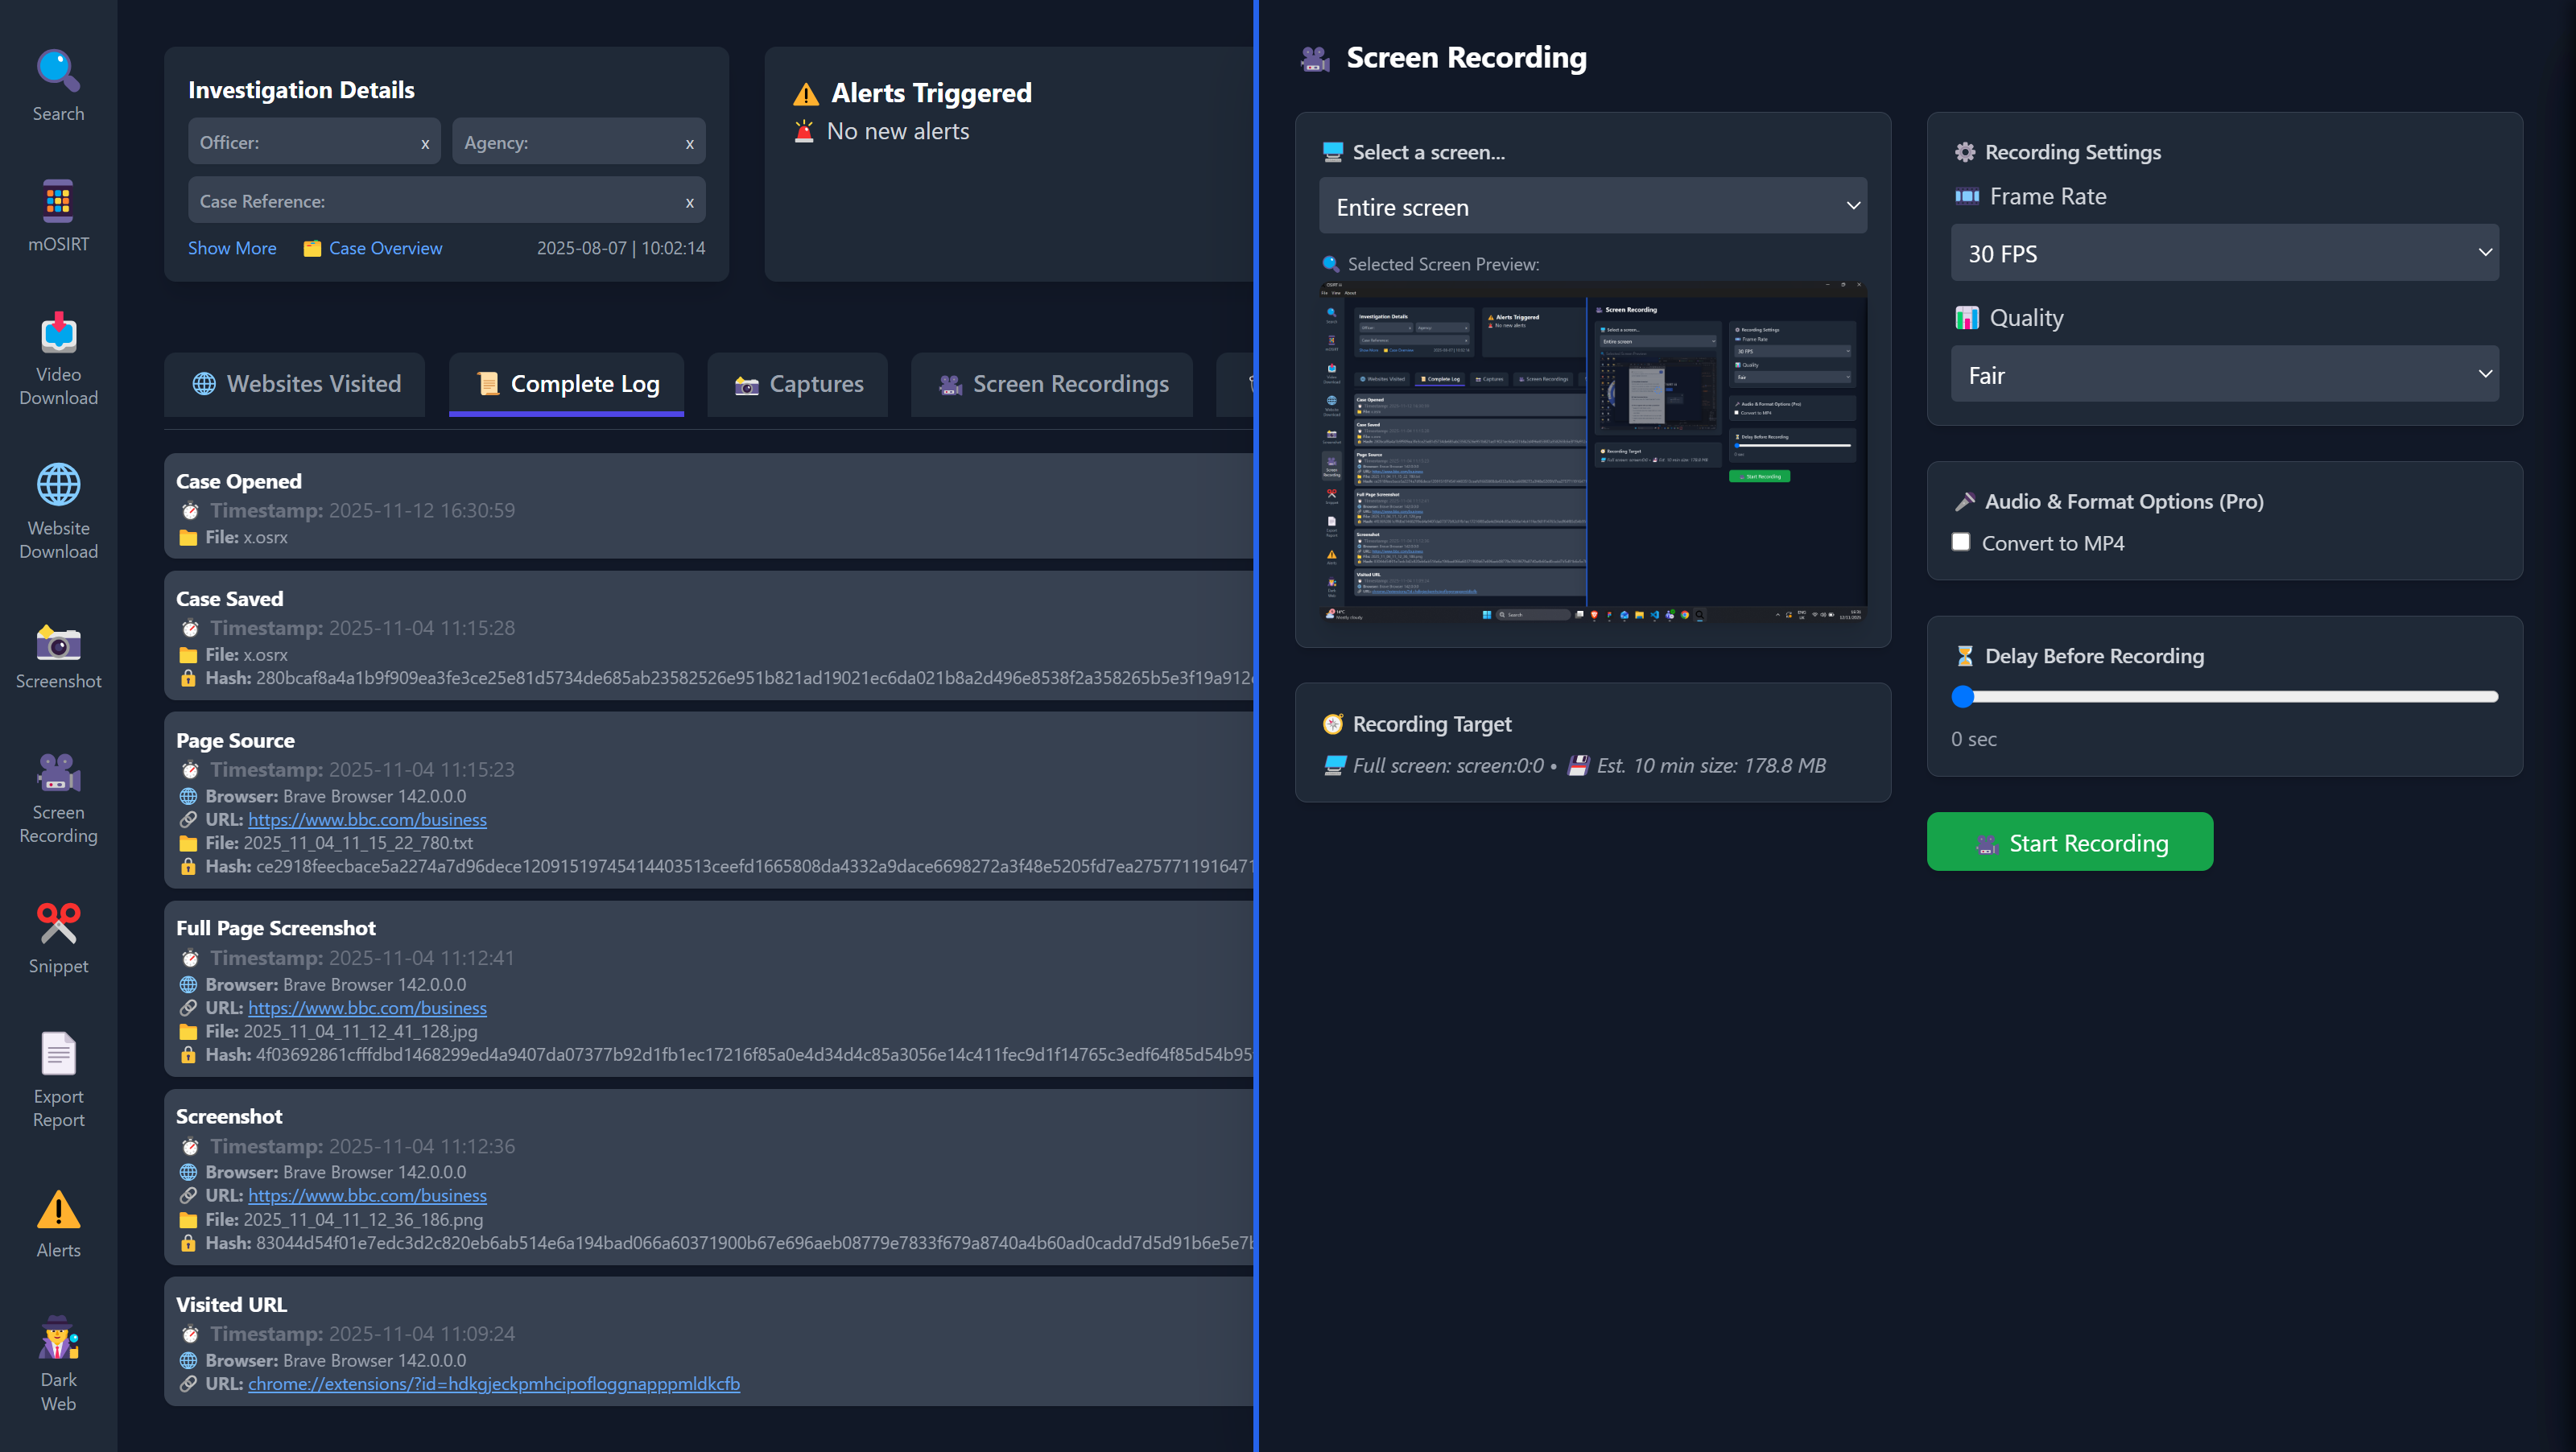
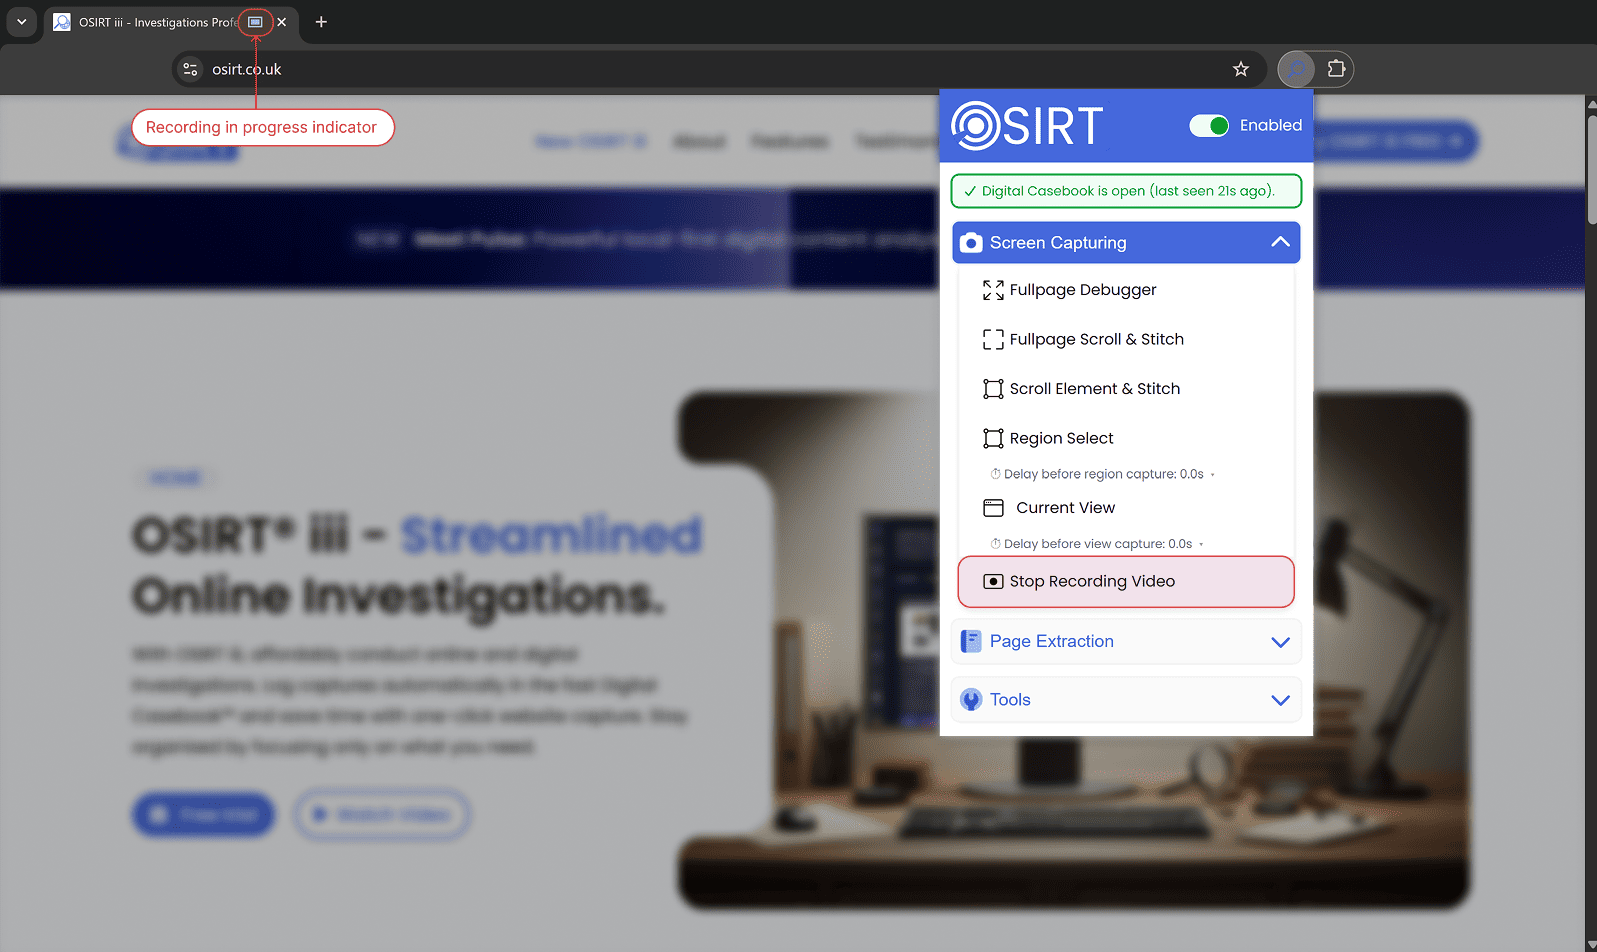
Screen Recording
Example: Screen Recording interface in OSIRT iii
The Screen Recording tool in
OSIRT iii lets you record
visual activity across your screen — including sound, and
optionally, a specific region of the screen rather than the full
display. It's ideal for capturing dynamic interactions, social
media scrolling, live chats, or evidence that unfolds over time.
Click the purple camera icon labelled
“Screen Recording” from the
left navigation panel to open the recording interface.
Select a Screen
Choose which display you want to record from the dropdown menu.
A live thumbnail helps confirm you’ve selected the right one.
Region Selection
Although the default is full-screen capture, you can also record a
custom region of the screen. This is particularly useful when you
want to isolate a specific window, chat box, or browser pane while
ignoring the rest.
Recording Target
The interface will indicate whether you're recording the full
screen or a region. It also estimates the file size for a
10-minute recording based on your settings.
Recording Settings
Frame Rate: Choose the smoothness of playback
(e.g. 30 FPS for standard quality).
Quality: Adjust recording quality — higher
quality means clearer video but larger file size.
Convert to MP4 (Pro Feature)
Tick this to automatically convert the recording from
.webm to
.mp4 format when it's done. MP4
is a more portable and compatible format, especially for
exporting evidence.
Delay Before Recording
Set a short countdown (e.g. 5 or 10 seconds) before the
recording begins. This gives you time to prepare content or open
necessary tabs.
Start Recording
Click the green
“Start Recording” button to
begin. A clear interface will allow you to stop the recording at
any time. Once stopped:
The file is saved directly to your case folder.
It’s logged in your case record with a timestamp and SHA-512
hash.
It appears under the Screen Recordings tab in the dashboard.
Pro
Tip:
Use a short delay before recording to open menus or hover over key
elements—this guarantees everything you need is visible when the
recording starts.
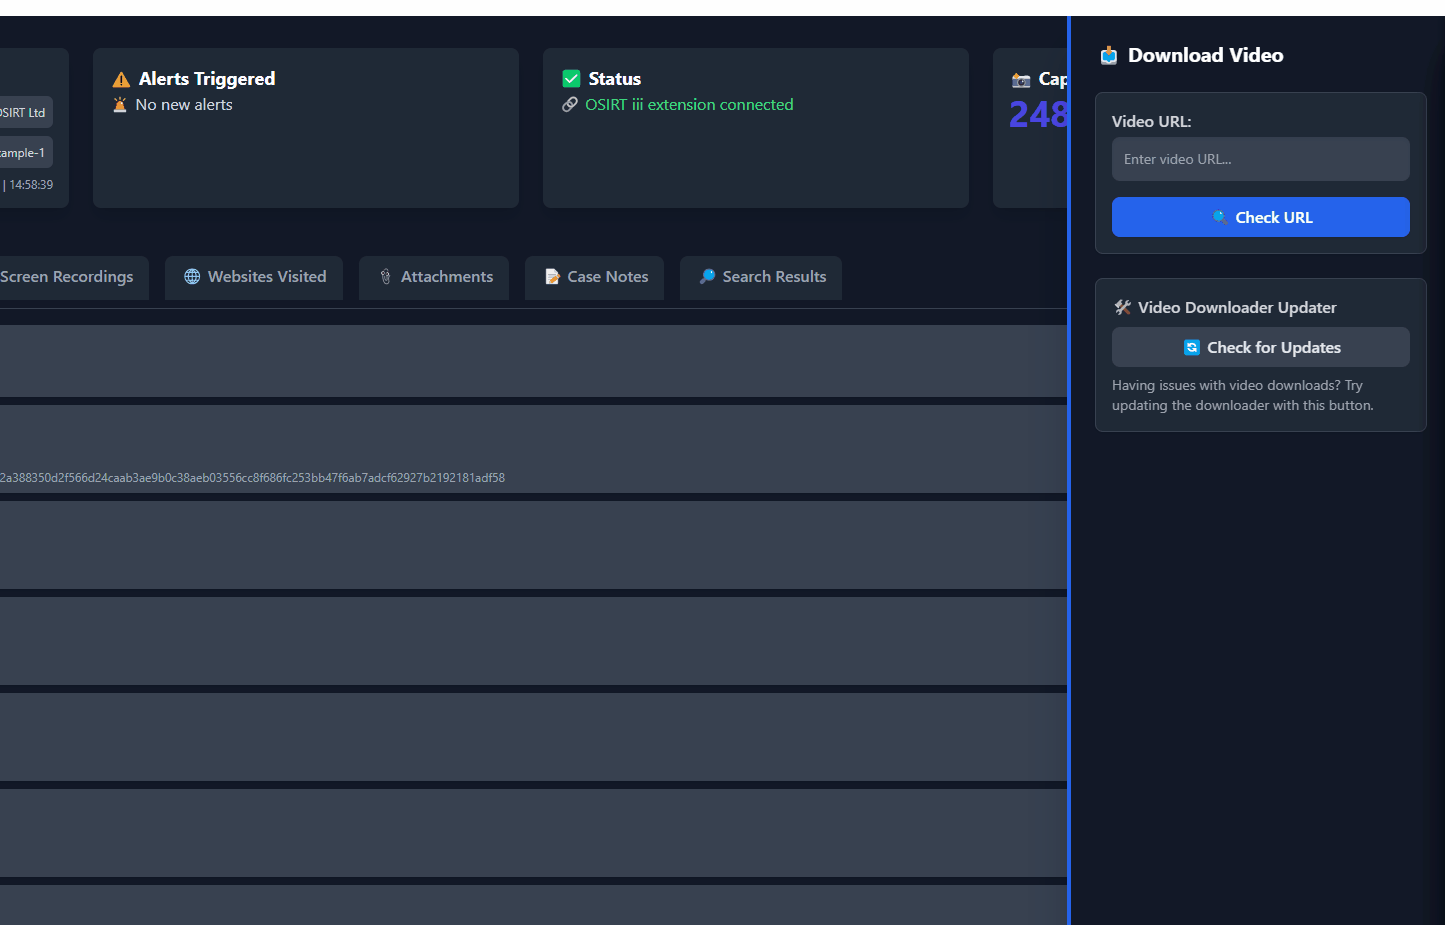
Video Downloading
The Video Download tool allows you to collect online video
evidence directly from platforms like YouTube, providing a
forensic copy of visual content that might otherwise change or be
removed. It's a crucial tool for investigations involving
user-generated content, misinformation, or social media activity.
Click the blue-and-pink download icon labelled
“Video Download” in the
left-hand navigation bar to open this tool.
Video URL
Paste a valid video link (e.g. from YouTube) into the Video URL
field. Supported URLs typically include public, non-password
protected videos.
Check URL
Click “Check URL” to validate
the link. If successful,
OSIRT iii will:
Connect to the platform
Extract video metadata
Display a thumbnail preview
Show the video title underneath
This lets you visually confirm you're about to download the
correct content.
Download Video
Once the video is verified, click the green
“Download Video” button.
OSIRT iii will:
Download the video directly to your active case folder
Assign a SHA-512 hash for authenticity
Log the action with a timestamp and full metadata
Display the video under the Captures tab in your case
The file is stored in its original resolution and format to
preserve evidential quality.
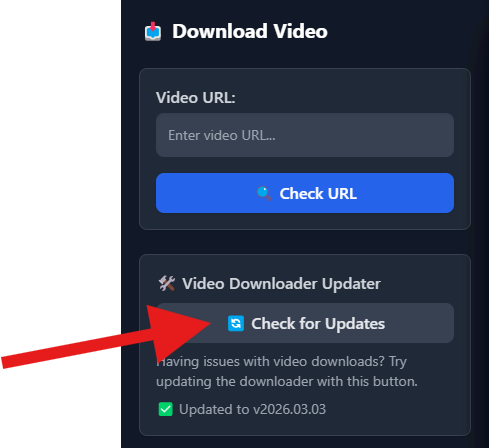
Version Check
The Video Downloader section at the bottom allows you to check
for updates to the underlying download engine — ensuring it
stays compatible with evolving video platforms.
This tool gives you a way to secure online video content before
it’s altered or removed, preserving it as evidence that can be
reviewed or included in reports.
Video Downloader Troubleshooting
If the video downloader is not working as expected, the first
thing to try is the built-in
Video Downloader Updater in the right-hand panel.
This updates the downloader component used by OSIRT iii and often
resolves issues with supported websites changing their video
delivery methods.
First step: run the updater
The most common cause of video download issues is an outdated
downloader component. OSIRT iii includes a built-in updater that
refreshes the downloader used by the application.
Open the Video Downloader panel.
Locate the Video Downloader Updater section.
Click Check for Updates.
Wait for the update process to complete before attempting the
download again.
Tip: Websites frequently change how they
deliver video streams. Updating the downloader ensures OSIRT iii
stays compatible with those changes.
Check the video URL
Make sure the URL pasted into the
Video URL field is the direct page containing
the video you want to collect. In some cases, shortened links,
embedded-player links, or copied redirect URLs may not work
correctly.
Use the full page URL where the video is visible in your
browser.
Make sure the page loads properly in the browser first.
If available, remove extra tracking parameters and try again.
If the URL checks but no video downloads
Some websites regularly change how their video streams are
delivered. If OSIRT iii can check the URL but the download still
fails, try the following:
Run Check for Updates in the updater section.
Retry the same URL after updating.
Try refreshing the source webpage and copying the URL again.
Confirm that the video plays normally in the browser before
downloading.
Other things to check
Make sure OSIRT iii has an active case open before
downloading.
Check that your internet connection is stable.
Some platforms may block downloads for certain protected or
restricted content.
Very large downloads may take time to initialise before
progress appears.
Note: Not every website or streaming format
will always be supported. Support can change over time depending
on the website and its delivery method.
Example
The animation below shows where to find and use the updater in
the
Video Downloader panel.
Best practice: If a user reports that video
downloading has suddenly stopped working on a site that
previously worked, update the downloader first before carrying
out deeper troubleshooting.
Live Stream Capture
Pro Feature
Live Stream Capture allows you to record active live broadcasts directly into
the current case. It is designed for situations where online video may be
temporary, edited after broadcast, restricted to logged-in users, or removed
before it can be reviewed later.
When a live capture is completed, OSIRT iii saves the video into the case,
processes it for playback where required, calculates a SHA-512 hash, and logs
the capture with the source URL, date, time, and related metadata.
Live Stream URL
Enter the full URL of the live broadcast you want to capture. This should
be the page where the stream is visible in your browser. For some
platforms, copied embed links, shortened links, or redirected links may not
work as reliably as the main video page URL.
Quality
Choose the quality before starting capture. Higher quality provides more
detail but creates much larger files and may be less stable on long
streams or poor connections. For most investigations, 720p is a balanced
option. Lower settings such as 480p or 360p can be useful for long-running
captures where file size is a concern.
Capture from Beginning
If supported by the platform, OSIRT iii can attempt to capture from the
beginning of the live broadcast or available replay buffer. Not all
platforms support this. If a capture ends unexpectedly quickly, try again
with this option disabled.
Save Live Stream Metadata
When enabled, OSIRT iii attempts to collect available metadata such as the
stream title, uploader or channel, platform, and original URL. Where
available, this information is preserved in the case record to provide
additional context for the captured video.
Use Cookie File
Some platforms require a logged-in session before a stream can be accessed.
In these cases, you can provide a cookies.txt file exported from a browser
session that is authorised to view the content.
The cookies file must be in Netscape cookie format. Cookie files are
sensitive because they may contain active session data. Only use cookie
files for accounts and material you are authorised to access, and handle
them securely.
One-click cookie export through the OSIRT browser extension is planned for
a future update. Until then, users must provide a compatible cookies.txt
file manually.
Starting and Stopping Capture
Enter the live stream URL.
Select the required quality.
Choose any optional settings, such as metadata or cookies.
Click Start Live Capture.
Click Stop Live Capture when you have captured enough material.
If the stream ends naturally, OSIRT iii will attempt to finalise and save
the capture automatically.
After Capture
Once capture has stopped, OSIRT iii finalises the video, processes it for
embedded playback where required, generates a SHA-512 hash, and adds the
result to the case. The video appears with the other captured artefacts and
is also recorded in the case log.
Platform Limitations
Live stream capture depends on how each platform delivers video. Some
platforms may provide a stable continuous stream, while others may only
expose a short replay segment or restrict access unless the user is logged
in.
Facebook Live can be particularly inconsistent. If a Facebook capture ends
after only a short period, the platform may have provided a limited replay
segment rather than a continuous live stream. In that situation, consider
using Screen Recording or Tab Recording as a fallback.
Recommended Workflow
Start capture early to avoid missing important context.
Use 720p or lower for long captures to reduce file size.
Use cookies only where authorised and only when required.
Use case notes or bookmarks to record important moments during review.
For critical streams, consider running a screen recording at the same time.
mOSIRT Capture (Mobile Evidence Collection)
Pro Feature
The mOSIRT tool lets you
capture screenshots, recordings, and logs from an Android device
connected to your computer. It's designed for mobile evidence
collection in live investigations and works through USB using
Android’s debugging capabilities.
To open it, click the
mOSIRT icon from the left-hand
navigation menu.
Setting Up Your Android Device
Before mOSIRT can detect your phone, you’ll need to prepare the
device:
Enable Developer Mode: Go to
Settings > About Phone and
tap Build Number several times
until you're told developer options are enabled.
Enable USB Debugging: In
Settings > Developer Options, switch on USB Debugging.
Connect the Device: Use a USB cable to plug
your phone into the computer. When prompted on the phone,
authorise the connection and tick
"Always allow from this computer".
Once connected, your device will appear in the dropdown menu,
and the status will show as
Connected.
Capture Options
Once your device is detected, you can perform the following
actions:
Take Screenshot: Captures a still image of
the mobile screen, saved directly to your case with a
timestamp and hash.
Start Recording: Begins a live screen
recording. You can interact with the device through the
mirrored window while recording. Close the window to end the
capture.
Timed Screenshot: Set a delay and take a
screenshot after a countdown.
Interval Screenshot: Automatically take a
series of screenshots at set intervals over a chosen duration.
All captures are logged and added to the case file securely.
Mirror Screen
Click Start Mirroring to view
and interact with the phone’s screen from your computer. This
lets you navigate apps and content as part of your
investigation.
Logcat Console
You can also collect background logs from the device by clicking
Start Logcat. These logs can
reveal technical events, errors, or hidden app activity. You can
clear the log, or pop it out into its own window for easier
review.
mOSIRT makes it easy to
document activity on a mobile device in a structured,
tamper-evident way.
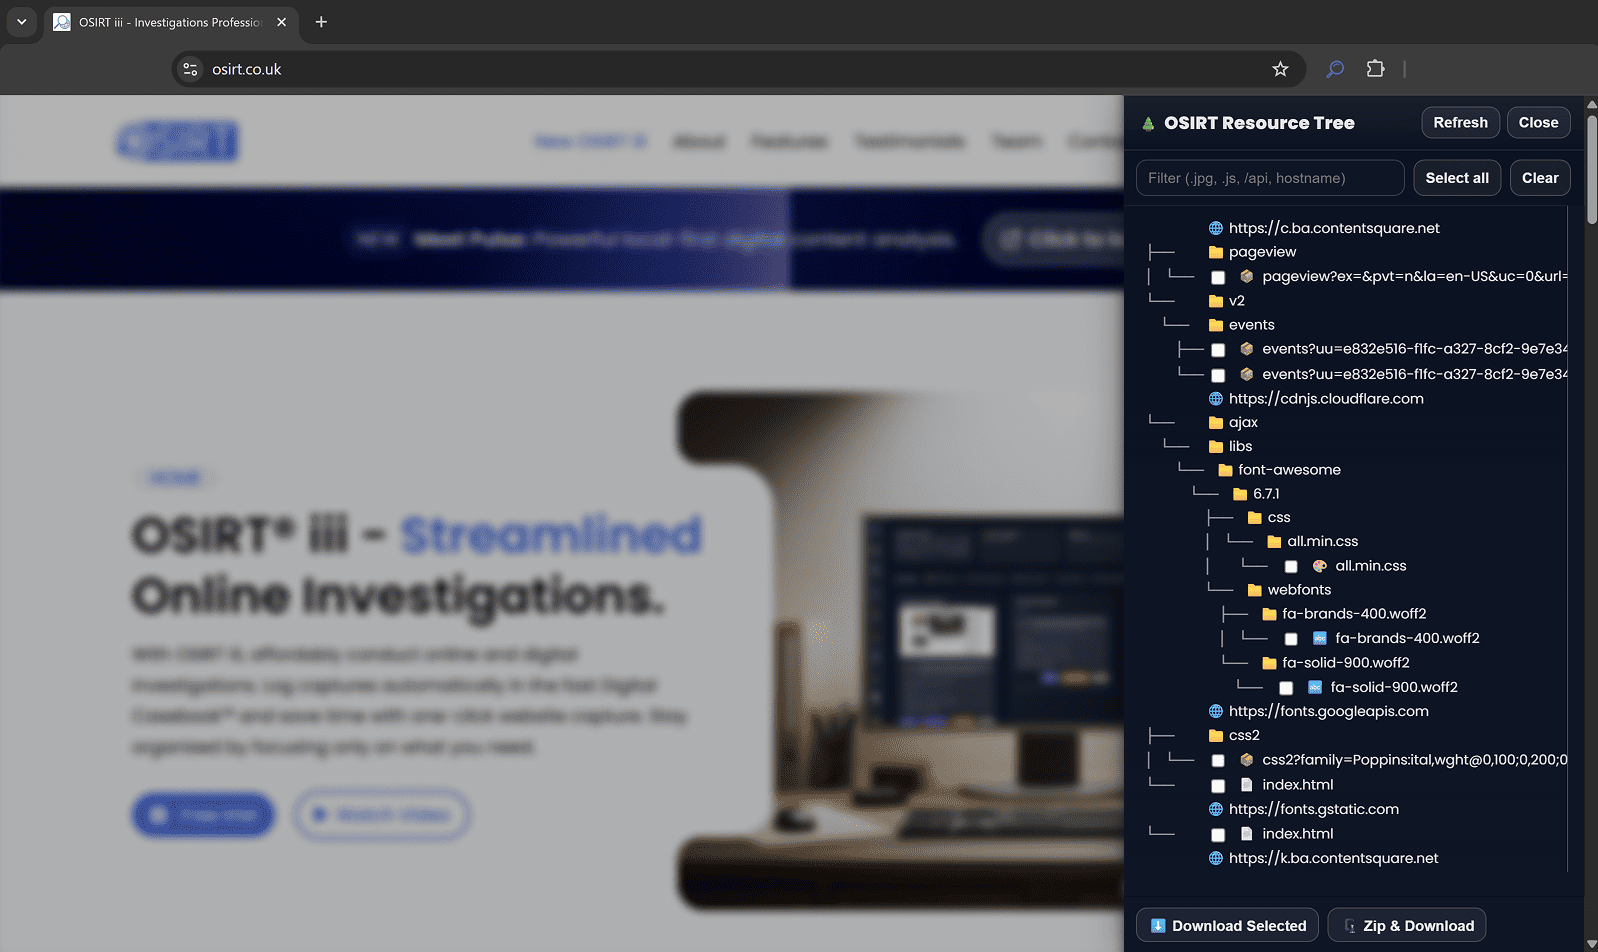
Website Download
Pro Feature
The Website Download tool is
designed to collect entire webpages or dynamic websites in a
structured, verifiable way. It captures the visible content,
background data, and optionally, a full-page screenshot. This is
especially useful for preserving online articles, social media
threads, and pages that load content as you scroll.
Click the globe icon labelled
“Website Download” in the
left-hand navigation menu to open the capture panel.
Website URL
Enter the full URL of the webpage you want to download. Make
sure the page is publicly accessible.
Save Location
Choose where the downloaded content will be stored inside your
case folder. Click
Browse to select or create a
subfolder.
Capture Options
Capture Images: Ensures all embedded images
on the webpage are downloaded.
Take Full Page Screenshot: Captures a
full-length visual image of the webpage from top to bottom,
not just what’s visible in the browser window.
XHR/Fetch Capture (Optional)
If the page loads content dynamically (e.g. social feeds,
comment sections), you can enable
Capture XHR/Fetch:
Poll Interval: How often OSIRT should check
for new content (in seconds).
Max Wait Time: How long OSIRT should keep
checking before ending the session.
This is useful for collecting live updates or data that appears
as the user scrolls or interacts with the page.
Behaviour Options
Max Scrolls: Defines how far OSIRT should
scroll down the page to trigger new content. Increasing this
can help capture pages with long feeds or infinite scroll.
User Agent: Lets you specify how OSIRT
identifies itself to the website. Default is Desktop, but you
can switch to Mobile if needed.
Output Options
Generate Index Report: Produces a summary of
all captured content for easy reference.
Zip Captured Files: Automatically compresses
the results into a zip file — handy for archiving or sharing.
Start Download
Once all options are configured, click the
Start Download button. The
entire session will be captured, saved to the case, and logged
in your case timeline with hash validation.
Pro Tip: When capturing social media feeds or
live comment threads, enable both
XHR/Fetch Capture and increase
Max Scrolls for more complete
evidence collection.
Report Exporting
The Report Exporting tool
allows you to generate a professionally structured report of all
evidence and actions taken in a case. This is ideal for internal
documentation, briefing materials, or presenting findings in legal
or investigative contexts.
Click the Report Export icon in
the left-hand navigation panel to open the export configuration
screen.
Folder Name and Report Name
Enter a name for the report folder and the title of the report
file. These fields define how the exported report is labelled
and organised.
Save Location
Choose where the report will be saved. Use the
Browse button to select or
create a destination folder.
Upload Logo
You can personalise the report by uploading your organisation’s
logo, which will appear on the cover page.
Select Data to Include
Case Element
Description
Webpage Log
Chronological record of captured webpages.
Webpage Artefacts
Full pages, HTML captures, or screenshots collected.
Videos
Downloaded or recorded video evidence.
Attachments
Any external files linked to the case.
OSIRT Actions
A list of all logged activities and system events.
Case Notes
Notes or annotations added during the investigation.
These will be compiled into a structured, timestamped format
with all artefacts linked to their associated hashes and
metadata.
Additional Options
Export Artefact Notes: Includes any notes
you've made on individual evidence items.
Open Report Folder After Creation:
Automatically opens the folder where the report was saved.
Save Copy to Case: Keeps a copy of the
generated report in your active case folder.
Date Range
You can optionally filter the report by a date range. Tick
Enable Date Range to only
include actions or evidence captured between specific dates.
Append to Report
Pro Feature
Upload an existing PDF or Word document (e.g. an external
statement or summary) and have it automatically added to the
start or end of the report. This is available to Pro users.
Insert Blank Pages
Pro Feature
You can choose to insert blank pages at the start or end of the
document, useful for printed reports that need separation
between sections.
Report Customisation
Add a protective marking label, such as
“OFFICIAL – SENSITIVE” or your
organisation’s internal classification, which will be shown in
the header of the report.
Export Report
When ready, click
Export Report to generate the
document. OSIRT iii will
compile all selected data into a clean, well-organised PDF with
case details, artefact evidence, and audit logs.
The exported report serves as a tamper-evident, court-ready
output that mirrors the integrity of your case folder.
Pro Tip:
Include your organisation’s logo and protective marking to give
your exported reports a professional, standardised appearance for
audits or court submissions.
Live Detection
Live Detection automatically checks newly captured
artefacts against investigator-defined detection rules.
When a match is found, OSIRT iii creates a detection card showing where the
match was found, what triggered it, and what action can be taken next.
Live Detection can help identify important intelligence such as usernames,
crypto wallets, email addresses, phone numbers, domains, keywords,
identifiers, and other structured patterns.
Enabling Live Detection
Open Manage Detection Rules from the Live Detection panel.
Tick Enable Live Detection.
Confirm the Live Detection dashboard card now shows active status.
When enabled, the status displays as active and the dashboard card shows a
green pulsing dot. When disabled, OSIRT iii will not check newly added
artefacts against detection rules.
Tip: Enable Live Detection at the start of a case so important artefacts
are checked as they are captured, not only during later review.
Adding Detection Tags
Detection tags are keywords or phrases that OSIRT iii should look for
inside captured content.
Once saved, every new artefact will be checked against these tags
automatically.
Useful thought: keep general tags broad enough to catch intelligence, but
specific enough to avoid noisy results.
Pattern Detection Pro
Pattern Detection allows OSIRT iii to detect structured
data using regex-powered rules instead of simple keywords.
This is especially useful for detecting:
Email addresses and phone numbers
Crypto wallets and IBANs
Telegram, Instagram, X / Twitter, TikTok, and Discord usernames
Passport numbers, IP addresses, onion domains, URLs, and seed phrases
Instead of searching for the word bitcoin, OSIRT iii
can detect an actual wallet structure such as:
bc1qxy2kgdygjrsqtzq2n0yrf2493p83kkfjhx0wlh
Pro tip: use pattern detection for high-value identifiers where the exact
value is unknown before capture.
Common Pattern Presets
To simplify setup, OSIRT iii includes built-in pattern presets. Enable
Treat as pattern, open Common Patterns,
and select a preset.
OSIRT iii automatically fills:
Tag name
Regex pattern
Suggested severity
Example match preview
Example presets include Email Address, International Phone Number, Bitcoin
Wallet, Ethereum Wallet, Monero Wallet, IBAN, SWIFT / BIC, Telegram
Username, Instagram Username, X / Twitter Username, TikTok Username,
Discord Username, Passport Number, IP Address, and Onion Domain.
Choosing Where to Search
Live Detection can scan multiple artefact sources.
Plan
Search locations
Standard
URLs and plain text files
Pro
Image files using OCR, documents, PDFs, Office files, reports, and
extracted file content
This allows detection across both visible text and extracted content from
images and files.
Example: OSIRT iii can detect a wallet inside a screenshot, a Telegram
handle inside a PDF, an email address in a text dump, or an onion domain
inside webpage content.
Understanding Detection Cards
When a match is found, OSIRT iii creates a Live Detection card with
immediate investigative context.
Severity and detection type
Signature Match pill for pattern detections
Source Bookmarked pill when the source is bookmarked
Matched source and matched snippet
Date, time, source file or URL, and current status
If a detection was triggered by Pattern Detection rather than a simple
keyword, the card shows Signature Match. This confirms
OSIRT iii matched the structure of the data rather than just matching tag
text.
Duplicate identical matches are ignored to reduce noise, but multiple
unique matches in the same artefact generate separate detection entries.
Filtering and Searching Results
Use filter pills to narrow detection results quickly:
All, New, Read, Unresolved, High, Today, Images, Bookmarked, Acknowledged
Use the search bar to live-filter detections by tag, severity, source,
file name, URL, matched snippet, note, or matched content.
Example: search wallet to isolate wallet-related
detections across the case.
Actions on Detection Cards
Action
What it does
Open
Opens the original source file or URL.
Add Note
Adds a case note directly to the source artefact.
Bookmark
Saves the source into the Case Timeline.
Acknowledge
Marks the detection as reviewed.
Mute Tag
Disables future detections for that specific tag.
Bookmark important detections so they are preserved in the Case Timeline
and available for later narrative building.
History View
Select View History to open the full detection history.
History separates current work from reviewed intelligence.
Current Session: active detections requiring review
Saved History: previously acknowledged detections
Detection history is paginated for performance and easier review.
Selecting Clear New removes the new status from active
items. It does not delete historical detections; it simply clears the
“new” state.
Performance Notes
Live Detection is designed for real investigative workloads. To maintain
performance:
The main panel loads in batches
History uses pagination
Duplicate matches are prevented
Bookmarked filters use source-level matching
Large files are processed safely
This keeps Live Detection responsive even in large investigations.
Best Practice Workflow
Enable Live Detection at the start of the case.
Add investigation-specific tags.
Enable high-value Pattern Detection presets.
Monitor high-severity detections first.
Bookmark important findings.
Acknowledge reviewed detections.
Use History for audit trail and reporting.
Recommended Pro workflow: combine Pattern Detection, OCR image scanning,
document scanning, Timeline bookmarks, and History review to turn Live
Detection into a stronger investigative intelligence workflow.
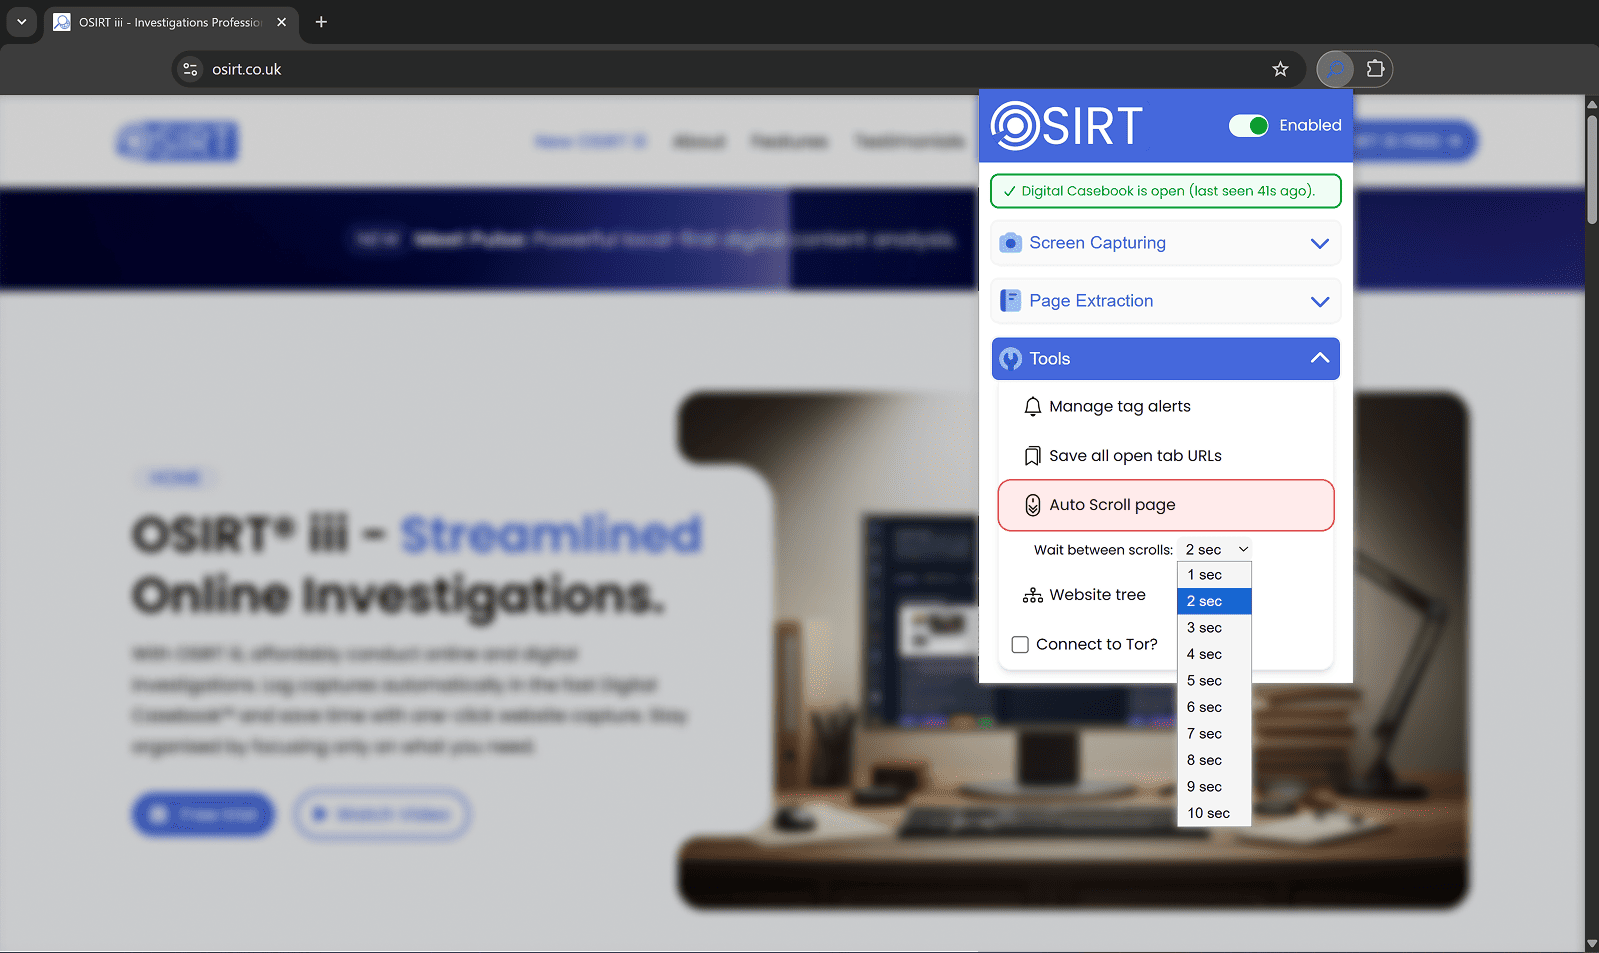
Search
OSIRT iii includes two types of search to help you find material quickly:
Full Case Search for searching across the whole case, and
tab search for narrowing down items inside the tab you are
already viewing.
Use Full Case Search when you are not sure where something is stored. Use
tab search when you already know the type of item you are looking for, such
as a capture, attachment, website visit, or screen recording.
Full Case Search
Searches across the wider case, including visited websites, artefacts,
videos, attachments, notes, and supported extracted text.
Tab Search
Searches only the current artefact tab, then lets you refine those
results using quick filter pills such as Bookmarked, Today, Images, or
Files.
Full Case Search
Full Case Search lets you search across the current case from one window.
It is designed for finding material when you do not yet know whether it is
stored as a capture, visited website, attachment, video, note, or extracted
file/OCR result.
Click the Search button in the left sidebar to open the
Full Case Search window. The search box is focused automatically, so you
can start typing straight away.
What you can search for
URLs and domains
Usernames, names, phrases, or keywords
File names and file paths
Hashes or partial hashes
Case notes and artefact notes
Text inside supported documents, when enabled
Text found in images using OCR, when enabled
Search sources
Websites Visited: visited URL records
Artefacts: captures, downloads, saved pages, page source, text grabs, and similar items
Videos: recorded or downloaded video evidence
Attachments: manually added case files
Notes: case notes and artefact notes
Date range
Use From and To to limit results to a
specific period. Leave both blank to search the whole case. You can also
use only From to search from a date onwards, or only
To to search up to a date.
Advanced Search / Pro options
The Advanced Search options allow OSIRT iii to search deeper than normal
case metadata.
Search Text in Documents searches inside supported
files such as TXT, CSV, JSON, PDF, DOCX, XLSX, and HTML.
Search Text in Images (OCR) searches text extracted
from image-based evidence.
Document and OCR searches can take longer, especially in large cases.
OSIRT iii will show progress updates while processing is underway.
Understanding results
Search results are shown as cards on the right-hand side of the window.
Depending on the result type, cards may show the source type, timestamp,
title, action, URL, file name, note, hash, matched text, file path, and a
preview where supported.
Results are automatically grouped into tabs such as
All, Images, Videos,
Documents, OCR Matches,
File Contents, Webpages,
Websites Visited, Attachments,
Notes, and Other. OSIRT iii only shows
result tabs that contain matches.
Quick filters
After a search, OSIRT iii may show filter chips such as
Matched by OCR, Matched inside file,
Images, Videos,
Documents, Has URL,
Has hash, Has note,
Has preview, Today, or
This week.
Multiple chips use AND behaviour. For example,
selecting Images and Has hash shows
only image results that also have a hash.
Sorting and view modes
Use the sort dropdown to order results by relevance, newest first,
oldest first, source, file type, or title where available.
Use Cards when you want previews and richer context.
Use Compact when you want to scan a large number of
results quickly.
Suggested workflow:
Start broad with a keyword, username, URL, or phrase across all sources.
Then narrow using result tabs, quick filters, sorting, and Compact view.
Searching Within Tabs
Each main artefact tab has its own search bar. This searches only the
items in the tab you are currently viewing, rather than searching the
whole case.
What each tab search covers
Captures searches screenshots, snippets, saved pages,
page source, text grabs, EXIF results, downloads, and similar captured
artefacts.
Websites Visited searches visited website records.
Attachments searches files manually added to the case.
Screen Recordings searches recorded video artefacts.
Refining results with pills
The filter pills next to the tab search bar refine the results already
found by your current tab search. They do not search the whole case by
themselves.
For example, if you search for osirt and then select
Bookmarked, OSIRT iii shows only bookmarked results in
that tab that also match osirt.
Available filters
Bookmarked: shows matching bookmarked results
Today: shows matching results captured or added today
Images: shows matching image-based results
Files: shows matching file-based results
Not every tab shows every filter. OSIRT iii only displays filters that
are useful for the tab you are using.
Combining filters
You can select more than one pill at the same time. For example:
osirt + Bookmarked +
Images
This shows results that match osirt, are bookmarked,
and are image-related. Click a selected pill again to turn it off.
Clearing and loading more
Use Clear to exit search mode for that tab. This clears
the search text, removes selected filter pills, and restores the normal
tab view.
If there are more matching results than can be shown at once, OSIRT iii
displays a Load 25 more artefacts button. Click it to
show the next batch.
Which Search Should I Use?
Use case
Best option
Why
You do not know where the item is stored
Full Case Search
Searches across multiple case sources at once
You are already looking at the right tab
Tab Search
Keeps results focused on the current evidence type
You need to search inside PDFs, DOCX files, HTML, or other documents
Full Case Search + Search Text in Documents
Enables deeper file-content searching
You need to search text visible inside images
Full Case Search + Search Text in Images (OCR)
Uses OCR to find text in image-based evidence
You want to scan lots of matching results quickly
Compact view
Reduces visual weight and hides previews
In simple terms: Full Case Search finds where something is.
Tab Search narrows what you are already looking at.
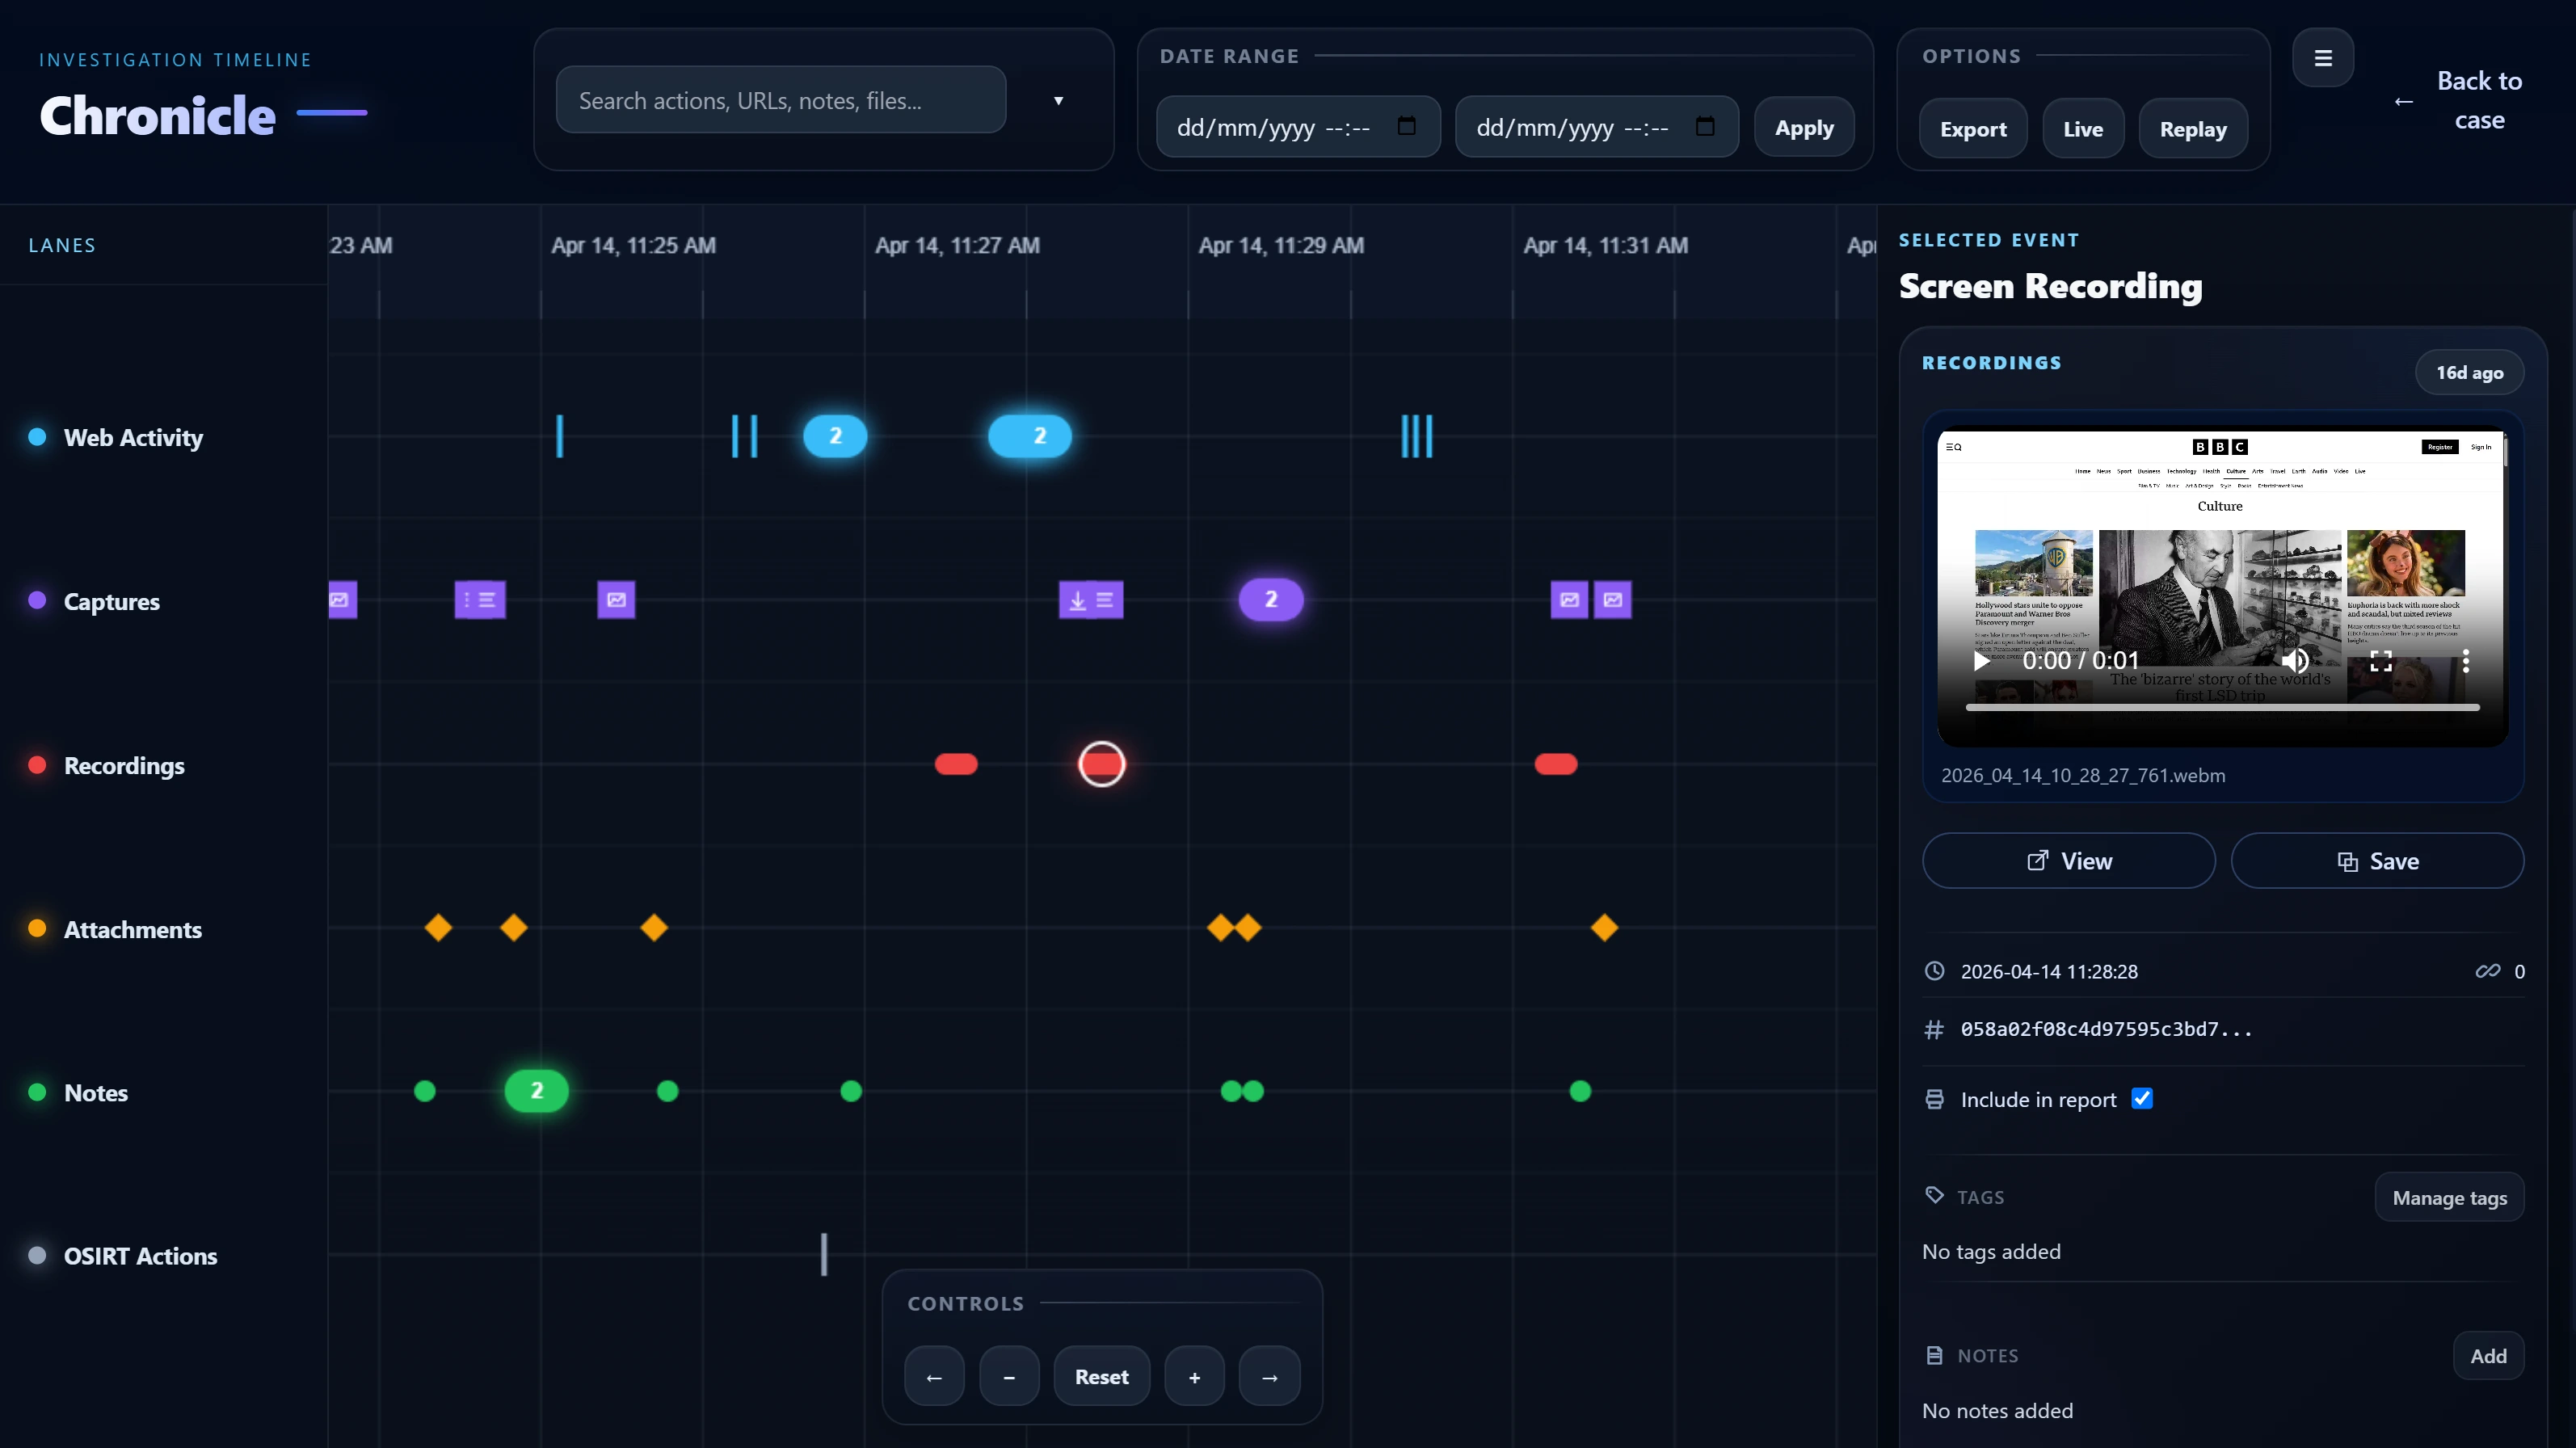
Chronicle Timeline
Chronicle is OSIRT iii’s interactive case timeline. It
brings investigation activity into one visual workspace so you can see what
happened, when it happened, and how events relate to each other.
Instead of reviewing screenshots, notes, downloads, web visits, recordings,
and attachments one by one, Chronicle places them on a single timeline and
lets you explore the case visually.
What Chronicle Shows
Chronicle displays case activity in separate visual lanes so different
types of evidence remain easy to understand.
Lane
What it contains
Web Activity
Browsing activity and logged web events.
Captures
Screenshots, snippets, saved pages, text captures, page source
captures, downloads, and similar web artefacts.
Recordings
Screen recordings and captured video evidence.
Attachments
Files attached to the case.
Notes
Case notes and evidence notes.
OSIRT Actions
System and workflow actions performed inside the case.
Each event is positioned by timestamp, helping you reconstruct the order
of activity across the whole case.
Opening Chronicle
Open Chronicle from the main interface using the
Show Chronicle button.
When Chronicle starts, it prepares the case timeline by:
Loading investigation events
Normalising timestamps
Loading bookmarks and tags
Drawing the timeline view
You may briefly see a loading screen while Chronicle prepares the
timeline.
Chronicle Layout
Chronicle is organised into three main areas:
Timeline area: the main canvas where events appear in
lanes across time.
Controls area: tools for zooming, panning, jumping to a
date/time, filtering, replaying activity, and following live updates.
Inspector panel: detailed information for the selected
event, including previews, tags, notes, bookmarks, and file actions.
Navigating the Timeline
Chronicle is designed to be explored interactively. You can move through
the timeline, zoom in on dense areas, and reset the view when needed.
Pan: click and drag the timeline, use pan buttons, or
use keyboard arrows where supported.
Zoom: use the mouse wheel, zoom buttons, or keyboard
controls.
Reset: return to the full available timeline range.
Jump: enter a specific date and time to centre the view
around that point.
Start zoomed out to understand the overall case shape, then zoom in to
inspect tightly grouped activity.
Reading Events and Clusters
Each event appears as a marker in its lane. Different event types use
different shapes, colours, and icons so you can distinguish web activity,
captures, recordings, notes, attachments, and bookmarked items quickly.
When many events happen close together, Chronicle may group them into a
cluster. Clicking a cluster will either zoom in so the events separate or
show a list of the events inside that cluster.
Inspector Panel
Click an event marker to open it in the inspector panel. The inspector is
where you review the selected event and interact with linked evidence.
The inspector can show:
Event type, lane, date, and time
Browser, URL, file path, related item count, or file hash
Image, video, or text previews where supported
Tags, notes, and bookmark controls
File actions such as View, Extract, or Save
If an event has a URL, you can click the URL row to copy it. Hashes can be
expanded from shortened form to the full value.
Filtering and Searching
Filtering turns Chronicle from a passive timeline into an active
investigation tool. Filters can be combined to focus on the evidence that
matters most.
Lane filters: show or hide Web Activity, Captures,
Recordings, Attachments, Notes, and OSIRT Actions.
Bookmark filter: show only bookmarked events.
Tagged filter: show only events that have tags.
Search filter: search by action, URL, browser, file
path, hash, notes, source type, or category.
Date/time range: limit the timeline to a specific
incident window.
Use filters to answer questions such as: what happened in this time
window, which captures match this keyword, or which bookmarked items need
review?
Tags, Notes and Bookmarks
Chronicle lets you add structure directly to timeline events, helping you
turn raw evidence into an organised case narrative.
Tags
Use tags to classify evidence by themes such as identity, activity,
technical details, relationships, risk, harm, or workflow status.
Notes
Add artefact-level notes to record observations, interpretation, and
why an item matters.
Bookmarks
Mark key events with a title, note, and priority colour such as red,
amber, green, or grey.
Right-clicking an event can also open a context menu for quick actions
such as adding, editing, or deleting a bookmark, or copying a timestamp.
Replay and Live Mode
Replay mode lets you step through investigation activity
chronologically. As replay progresses, Chronicle updates the selected
event, inspector, and playhead so you can understand the case as a
sequence.
Replay controls typically include jump to start, previous event,
play/pause, next event, jump to end, a scrubber slider, and speed control.
Live mode is useful for cases that are still updating.
When follow mode is enabled, Chronicle refreshes regularly, checks for new
events, and keeps the view focused on recent activity.
Keyboard Shortcuts
Shortcut
Action
T
Open Chronicle
Escape
Close Chronicle
Left / Right
Pan the timeline
Up / Down
Zoom in or out
F
Toggle follow mode
J
Focus the jump input
1–6
Toggle lane filters
Space
Play or pause replay
, / .
Previous or next replay step
Home / End
Jump to replay start or end
Exporting Chronicle
Chronicle can export a read-only HTML timeline for sharing, review, or
preserving a case snapshot.
The export can include:
Timeline title and export timestamp
Lane definitions and artefacts
Bookmark data, tags, and artefact notes
Preview text for supported files
File references where available
Chronicle shows toast notifications while the export is running, when it
completes, or if something fails.
Typical Chronicle Workflow
Open Chronicle and let the timeline populate.
Get the full picture by starting zoomed out and looking
for bursts, gaps, clusters, and event sequences.
Narrow the view with lane filters, search, date range,
or jump to time.
Inspect key events using the inspector panel and file
previews.
Add structure with tags, notes, and bookmarks.
Reconstruct the sequence using replay mode.
Export a read-only HTML timeline if needed.
Best Practices
Start wide, then narrow into the detail.
Use filters early to reduce noise.
Tag evidence as you review it, not only at the end.
Bookmark key moments as soon as you find them.
Add notes directly to evidence so context is preserved.
Use replay mode when you need to understand the case narrative.
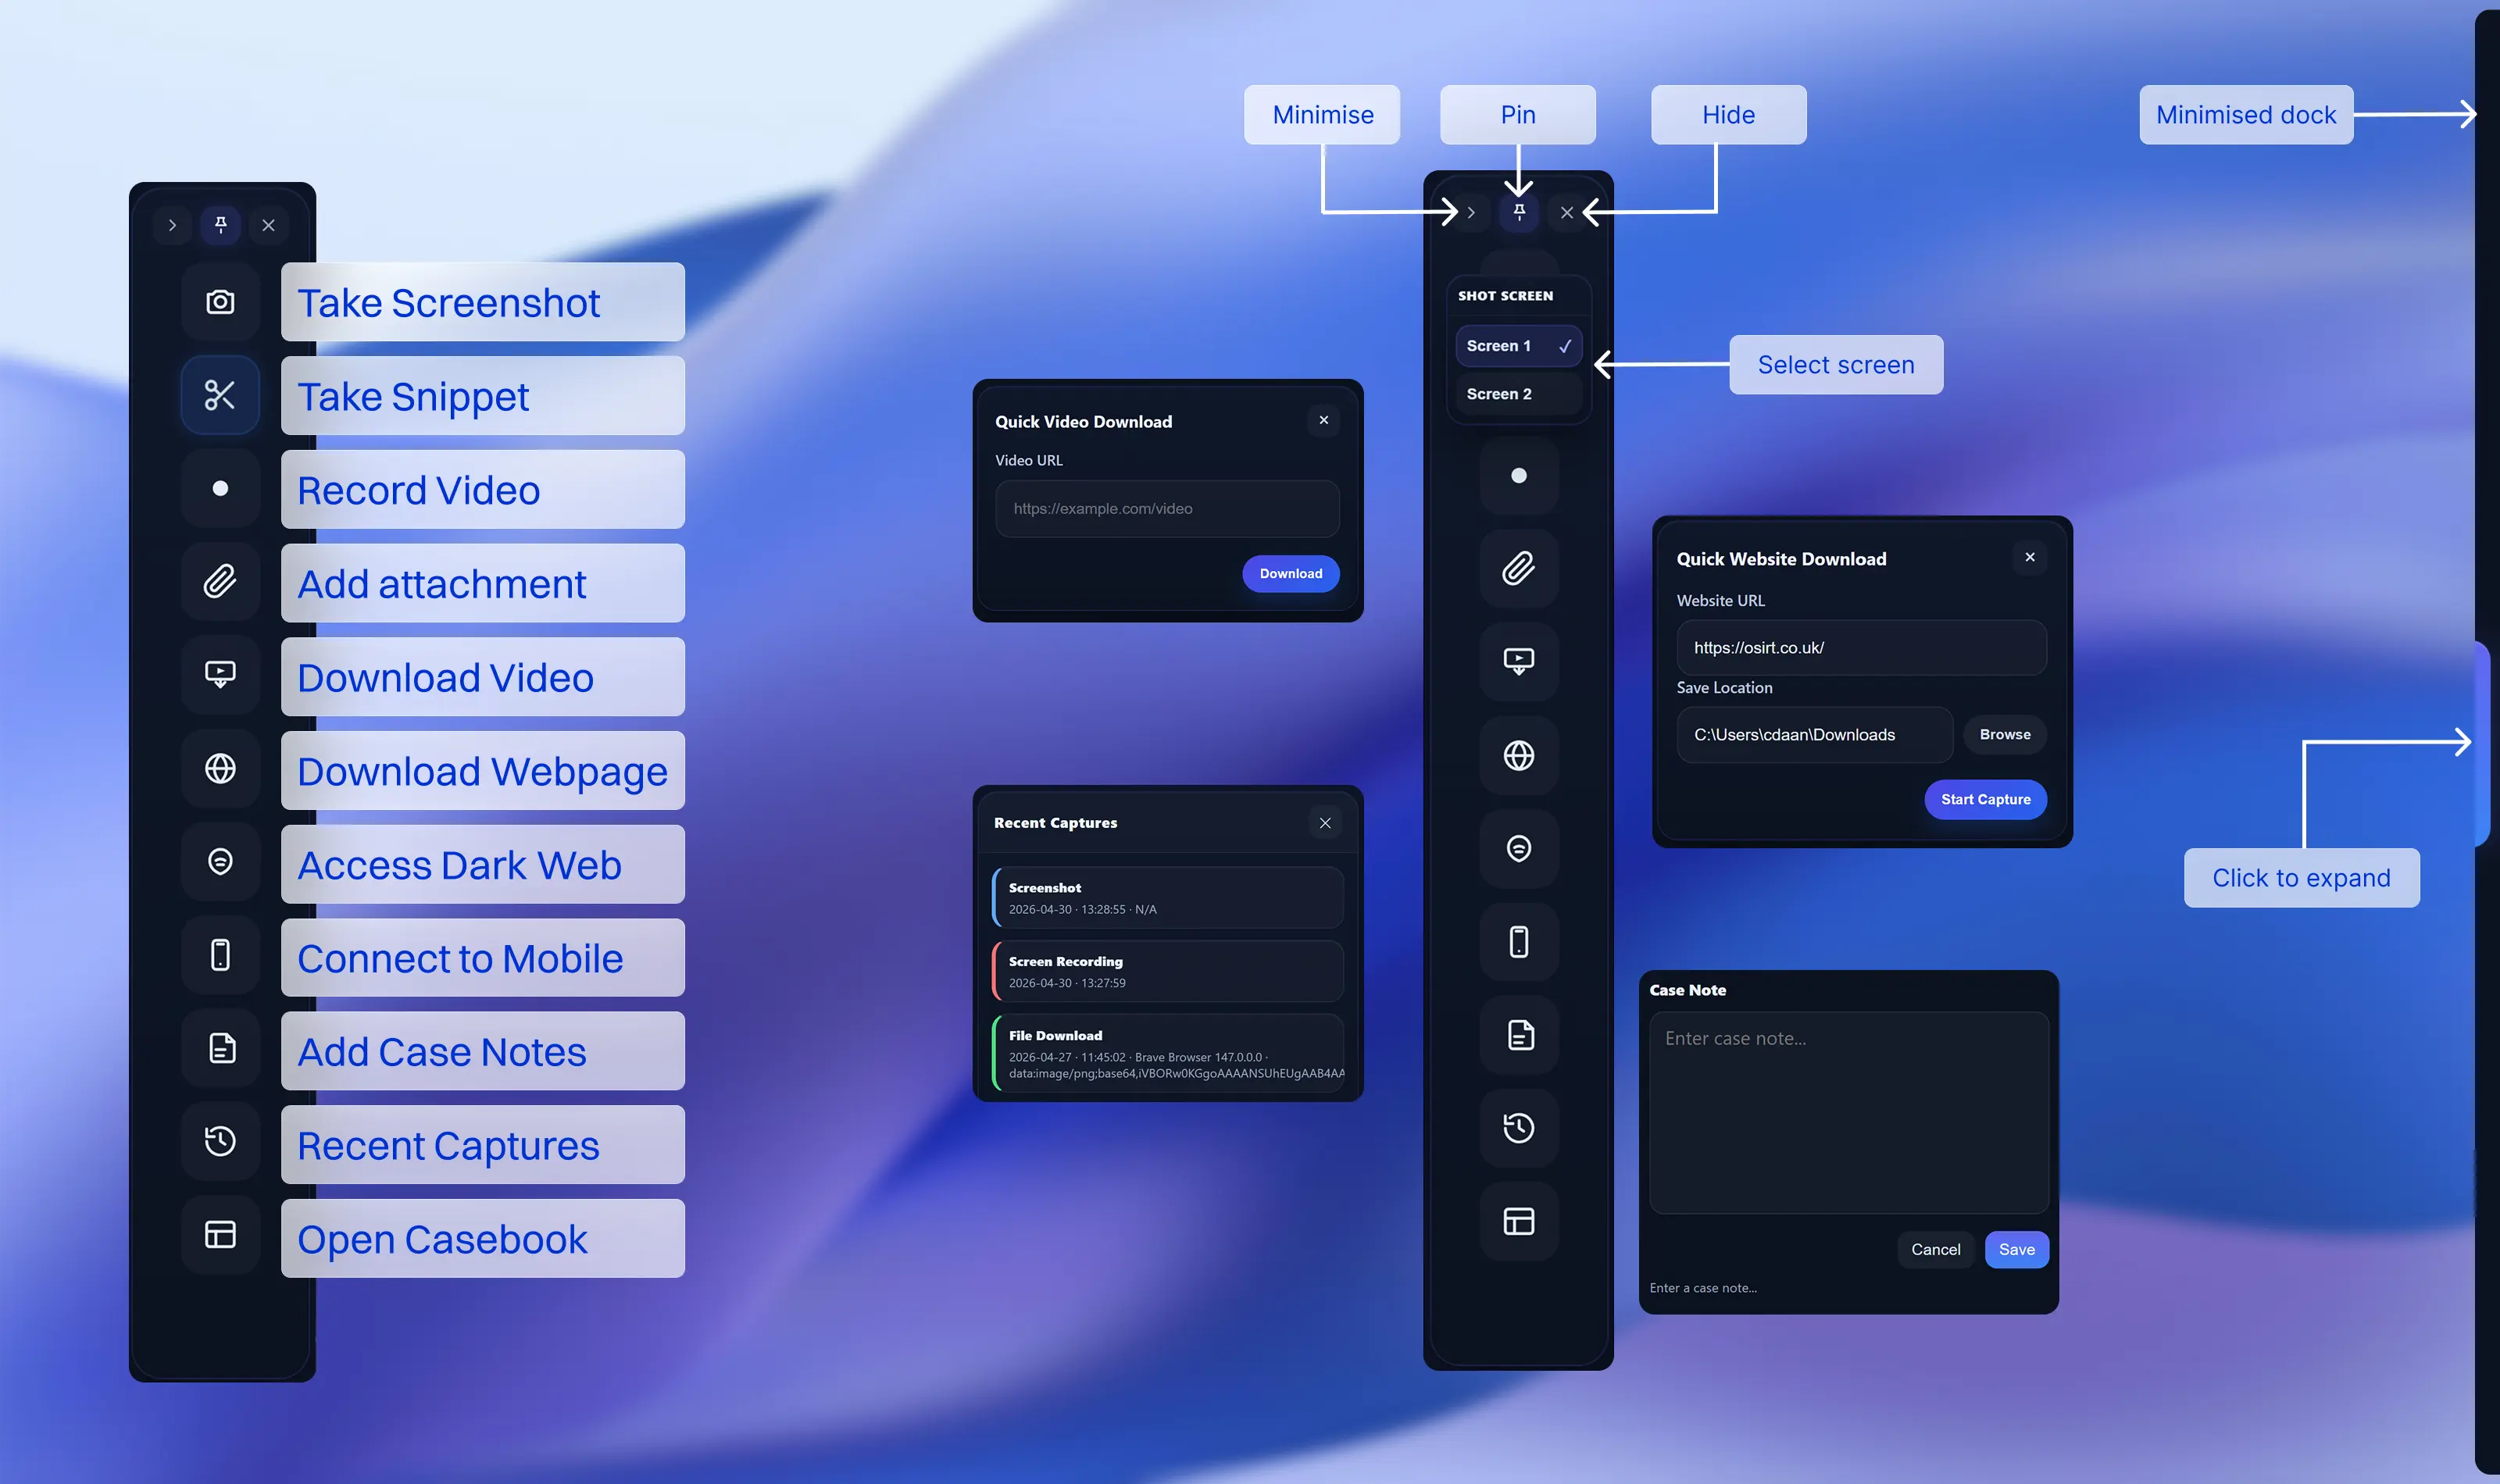
OSIRT Dock
The Dock is a floating control panel that provides
immediate access to evidence capture and investigative tools.
It allows you to perform actions quickly without switching back to the main
OSIRT iii window, while ensuring everything is logged to the active case.
Overview
The Dock is designed for continuous workflow. It sits above your working
environment and helps you capture, record, download, and document
evidence in real time.
Its purpose is to reduce missed evidence and eliminate interruptions
during live investigations.
Think of the Dock as your rapid-access investigation layer — capture first,
organise later.
Top Controls
Minimize
Collapses the Dock into a slim edge tab. The Dock remains active but
hidden, and clicking the edge tab restores it.
Pin
Controls whether the Dock stays open. When pinned, it remains visible.
When unpinned, it automatically collapses after the cursor leaves it.
Hide
Closes the Dock entirely. It can be reopened later from the main
application when needed.
Capture Tools
Tool
Purpose
Screenshot
Captures the full screen immediately with one click.
Snippet
Captures a user-defined region of the screen using a selection
overlay.
Record
Starts and stops screen recording, including save and feedback.
Right-clicking Screenshot or Record
opens the screen selection menu so you can choose which display is used.
Your selected screen is remembered for future captures.
Evidence Tools
Add Attachment
Adds a local file directly into the case. The Dock handles ingestion,
logging, and evidence registration automatically.
Video Download
Opens the video input flow. Enter a URL and the Dock handles the
download process, with progress and completion shown through
notifications.
Website Download
Starts the website preservation workflow, allowing structured capture
of web content as evidence.
Investigative Tools
Dark Web
Toggles the Tor environment. Clicking starts or stops the session, and
the button changes visual state while active.
Mobile Device
Handles connection to a mobile device. The first click connects the
device; clicking again disconnects it.
When connected, additional controls become available for:
Device screenshots
Mirror sessions
Recording device activity
Documentation
Case Note
Opens a quick note input for immediate documentation. Notes are
timestamped automatically.
Recent Captures
Opens a compact view of recent activity so you can quickly confirm
successful captures.
Casebook
Brings the main OSIRT iii window into focus for deeper review,
organisation, tagging, and reporting.
Interaction Behaviour
When the Dock is not pinned, it automatically minimizes after the cursor
leaves the area. A short delay helps prevent accidental minimization.
Clicking the edge tab restores the Dock. After restoring, it will not
immediately collapse again, preventing accidental re-minimization.
The Dock can also be repositioned by dragging. While dragging,
auto-minimize is temporarily disabled to avoid unintended behaviour.
This keeps the Dock accessible without permanently taking up screen space.
Screen Selection Menu
The screen selection menu is available by right-clicking the
Screenshot and Record buttons.
It displays all available screens, highlights the current selection,
and saves your choice immediately when selected.
The menu closes automatically after a selection is made.
Feedback System
Every Dock action provides immediate visual feedback.
Buttons show when an action is in progress
Success states confirm completed actions
Error states clearly indicate failures
Recording actions remain visibly active while recording
A compact notification area also displays short status messages such as:
Capture progress
Recording status
Download completion
Device connection changes
These messages appear briefly and dismiss automatically.
Typical Workflow
Use the Dock to capture screenshots, snippets, or recordings.
Add notes where context is important.
Use Recent Captures to verify results quickly.
Add attachments, downloads, or website captures as needed.
Open the Casebook when deeper review or reporting is required.
The Dock is designed for speed — capture evidence as it happens without
interrupting your workflow.
Screenshot Capture Card
When you capture a screenshot in
OSIRT iii, it appears as a
visual card inside the
Captures tab. Each card provides
a detailed, tamper-evident summary of the artefact, combining both
visual and technical metadata in one place.
Here’s what each section of a screenshot capture card includes:
Screenshot Preview
A thumbnail of the captured image is shown at the top of the
card. This lets you quickly recognise the content at a glance
without opening the file.
Hash
Beneath the preview, two hash values are shown:
The raw SHA-512 hash of the
file, proving the file’s integrity.
A shortened display hash that still uniquely identifies the
file, useful for referencing or quick matching.
Timestamp
Displays the exact date and time when the screenshot was taken.
URL
If the screenshot was taken from a webpage using the OSIRT
browser extension, the URL is automatically recorded and
displayed here.
Browser
Lists the browser used to take the screenshot — helpful for
establishing context or verifying how the content appeared.
Export to Report
Ticking this box ensures the screenshot is included in the final
report when it’s exported. You can untick it if you prefer to
exclude this particular capture.
Action Buttons
Each screenshot capture card includes the following actions:
View: Opens the full image in
a separate viewer.
Extract Text
Pro Feature
Runs OCR on the image to extract visible text — useful for
analysing screenshots of messages or documents.
Save a Copy: Lets you export
a separate copy of the screenshot to a location of your
choice.
Note: Allows you to attach a
comment or observation directly to the capture, which will be
included in the case log and final report.
These cards give you a complete, evidence-ready record of every
screenshot you capture, combining image, metadata, and user input
in a single place.
Bookmarking Cards
Bookmarks help you mark important artefacts so they are easier to find,
review, and include in your investigation workflow.
Most artefact cards can be bookmarked, including captures, visited websites,
attachments, recordings, downloads, notes, EXIF data, and other saved
evidence items.
Tip: Use bookmarks for items that matter to the case, not
for every artefact. This keeps your review workflow focused and useful.
Mark key evidence
Highlight items that need attention, review, or inclusion in a report.
Add context
Record why an artefact matters using a bookmark note.
Refine searches
Use the Bookmarked filter pill in tab search to narrow results.
Adding a bookmark
On an artefact card, select Add bookmark.
A bookmark window opens where you can add extra context, such as a
title, priority, or note, depending on the card type and available
fields.
Save the bookmark when you are done.
The card will then show a bookmarked state, usually with a highlighted
border or an Edit bookmark button.
Editing a bookmark
Once a card has been bookmarked, the bookmark button changes to
Edit bookmark.
Select Edit bookmark to update the bookmark details,
change the priority, or revise the bookmark note.
Removing a bookmark
Open Edit bookmark on a bookmarked card.
Use the remove or delete option in the bookmark window.
After removal, the card returns to its normal appearance and the button
changes back to Add bookmark.
Bookmark priority
Bookmarks can be given a priority such as low,
medium, high, or
important, depending on the options shown in your version
of OSIRT iii.
Priority is useful for quickly identifying evidence that needs extra
attention.
Examples of higher-priority bookmarks
Key evidence
Suspect identifiers
Important screenshots
Critical URLs
Files requiring review
Artefacts to mention in a report
Pro Tip:
Agree a priority approach at the start of an investigation. For example,
use Important only for evidence that is likely to appear
in the final report.
Bookmark notes
Bookmark notes are separate from normal artefact notes. Use bookmark notes
to explain why the item matters.
Example note
Potential account profile linked to the subject.
Example note
Important timestamp showing access to relevant page.
Normal card notes can still be used for wider investigation comments.
Finding bookmarked items
When using tab search, select the Bookmarked filter pill
to show only bookmarked results that match your current search.
Example
Searching for:
osirt
Then selecting Bookmarked will show only bookmarked
cards that also match osirt.
Important: The bookmark filter is a search refiner. It
does not search the whole case by itself.
Bookmarks in Chronicle
Bookmarked artefacts can also be useful when reviewing a case in Chronicle
or timeline-style views. Bookmarks help highlight important events and make
key items easier to identify during review.
Good practice:
Add a short note explaining why the item was bookmarked, and use priority
levels consistently across the investigation.
Image Viewer
Clicking View on any screenshot
capture card opens the
OSIRT iii Image Viewer, a
dedicated window for examining, exporting, and annotating visual
evidence. It’s built to give investigators an easy way to review
full-resolution images while also preparing them for presentation
or inclusion in reports.
Here’s what you can do in the viewer:
Zoom and Navigation
Use the + /
– /
Fit to screen /
1:1 controls at the bottom to
zoom in and out or reset the image to its actual size. This
makes it easy to inspect small details such as chat messages,
timestamps, or embedded links.
Save Annotated
Click Save Annotated to export
a copy of the image with a timestamp and the source URL overlaid
directly onto the screenshot. This provides clear, visible
context and traceability — ideal for courtroom evidence or case
summaries.
The annotation is automatically formatted and positioned for
legibility, ensuring no critical content is obscured.
Save as Printable PDF
This option allows you to export the screenshot as an
A4 PDF version, preserving the
full image at high quality. This is useful for hard-copy
printing or when submitting digital bundles that require
PDF-only formats.
The viewer makes it easy to transition from raw capture to
presentable, context-rich evidence in just a couple of clicks —
all while maintaining forensic integrity.
Text-Based Capture Card
When you capture a text-based artefact — such as a webpage’s HTML
source, a JSON response, or any structured text —
OSIRT iii generates a detailed
text artefact card within the
Captures tab. These cards ensure
every detail of the captured content is safely stored,
hash-verified, and available for export.
File Type
The card clearly identifies the type of capture, such as
Page Source Captured, and
includes a link to preview the content in plain text format.
Clicking Preview allows you to
quickly check the contents without opening an external editor.
Hash
Every captured file includes:
A unique identifier for the capture
A SHA-512 hash to verify the
integrity of the file
This ensures the evidence hasn’t been altered since it was
captured.
URL
Shows the exact webpage address from which the page source was
taken — critical for verifying the origin of the content.
Timestamp
Displays the exact date and time the source was captured,
recorded to the second.
Browser
Indicates which browser version was used during the capture —
helpful for reviewing differences in how sites behave across
browsers.
Export to Report
Tick this box to include the artefact in your final report. If
left unticked, it will remain in the case file but be excluded
from the export.
Action Buttons
Each text artefact card includes the following actions:
View File: Opens the full
source code or text content in a clean, readable format.
Save Copy: Saves a duplicate
of the file outside the case, if needed.
Add Note: Lets you attach
context or observations to the artefact.
Text artefacts are especially valuable for verifying background
code, form content, embedded scripts, or timestamps that aren't
visible in a regular screenshot.
OSIRT iii ensures this data is
captured and preserved in its original form for later analysis or
courtroom use.
MHTML Capture Card
When you capture an MHTML file in
OSIRT iii, the entire webpage —
including layout, styling, images, and text — is preserved in a
single, self-contained format. This is especially valuable for
storing live pages exactly as they appeared at the time of
investigation, without relying on an internet connection to view
them later.
Captured MHTML artefacts are displayed as dedicated cards in the
Captures tab.
Preview and Metadata
Each card provides the following information for easy
identification and traceability:
Preview link: Quickly check
the content.
Original URL: Displays where
the page was captured from.
Timestamp: Indicates the
exact moment the page was saved.
Browser version: Shows the
browser used during capture.
View File
Clicking View File opens the
MHTML in OSIRT’s built-in offline viewer. This ensures:
The page renders safely and accurately without making a live
network connection.
No scripts, redirects, or live content are reloaded —
preserving the forensic integrity of the capture.
This is particularly useful when reviewing pages that could
contain dynamic or potentially harmful elements, as the offline
viewer neutralises active content.
Other Options
Additional actions available on each MHTML capture card include:
Save Copy: Allows you to save
an additional copy elsewhere if needed.
Add Note: Attach your own
commentary, findings, or observations.
Export to Report: Toggle to
include or exclude this artefact in the final exported case
report.
MHTML captures offer a reliable, verifiable way to preserve how a
webpage looked at a specific point in time — with full visual
fidelity and zero risk of altering or reloading live content.
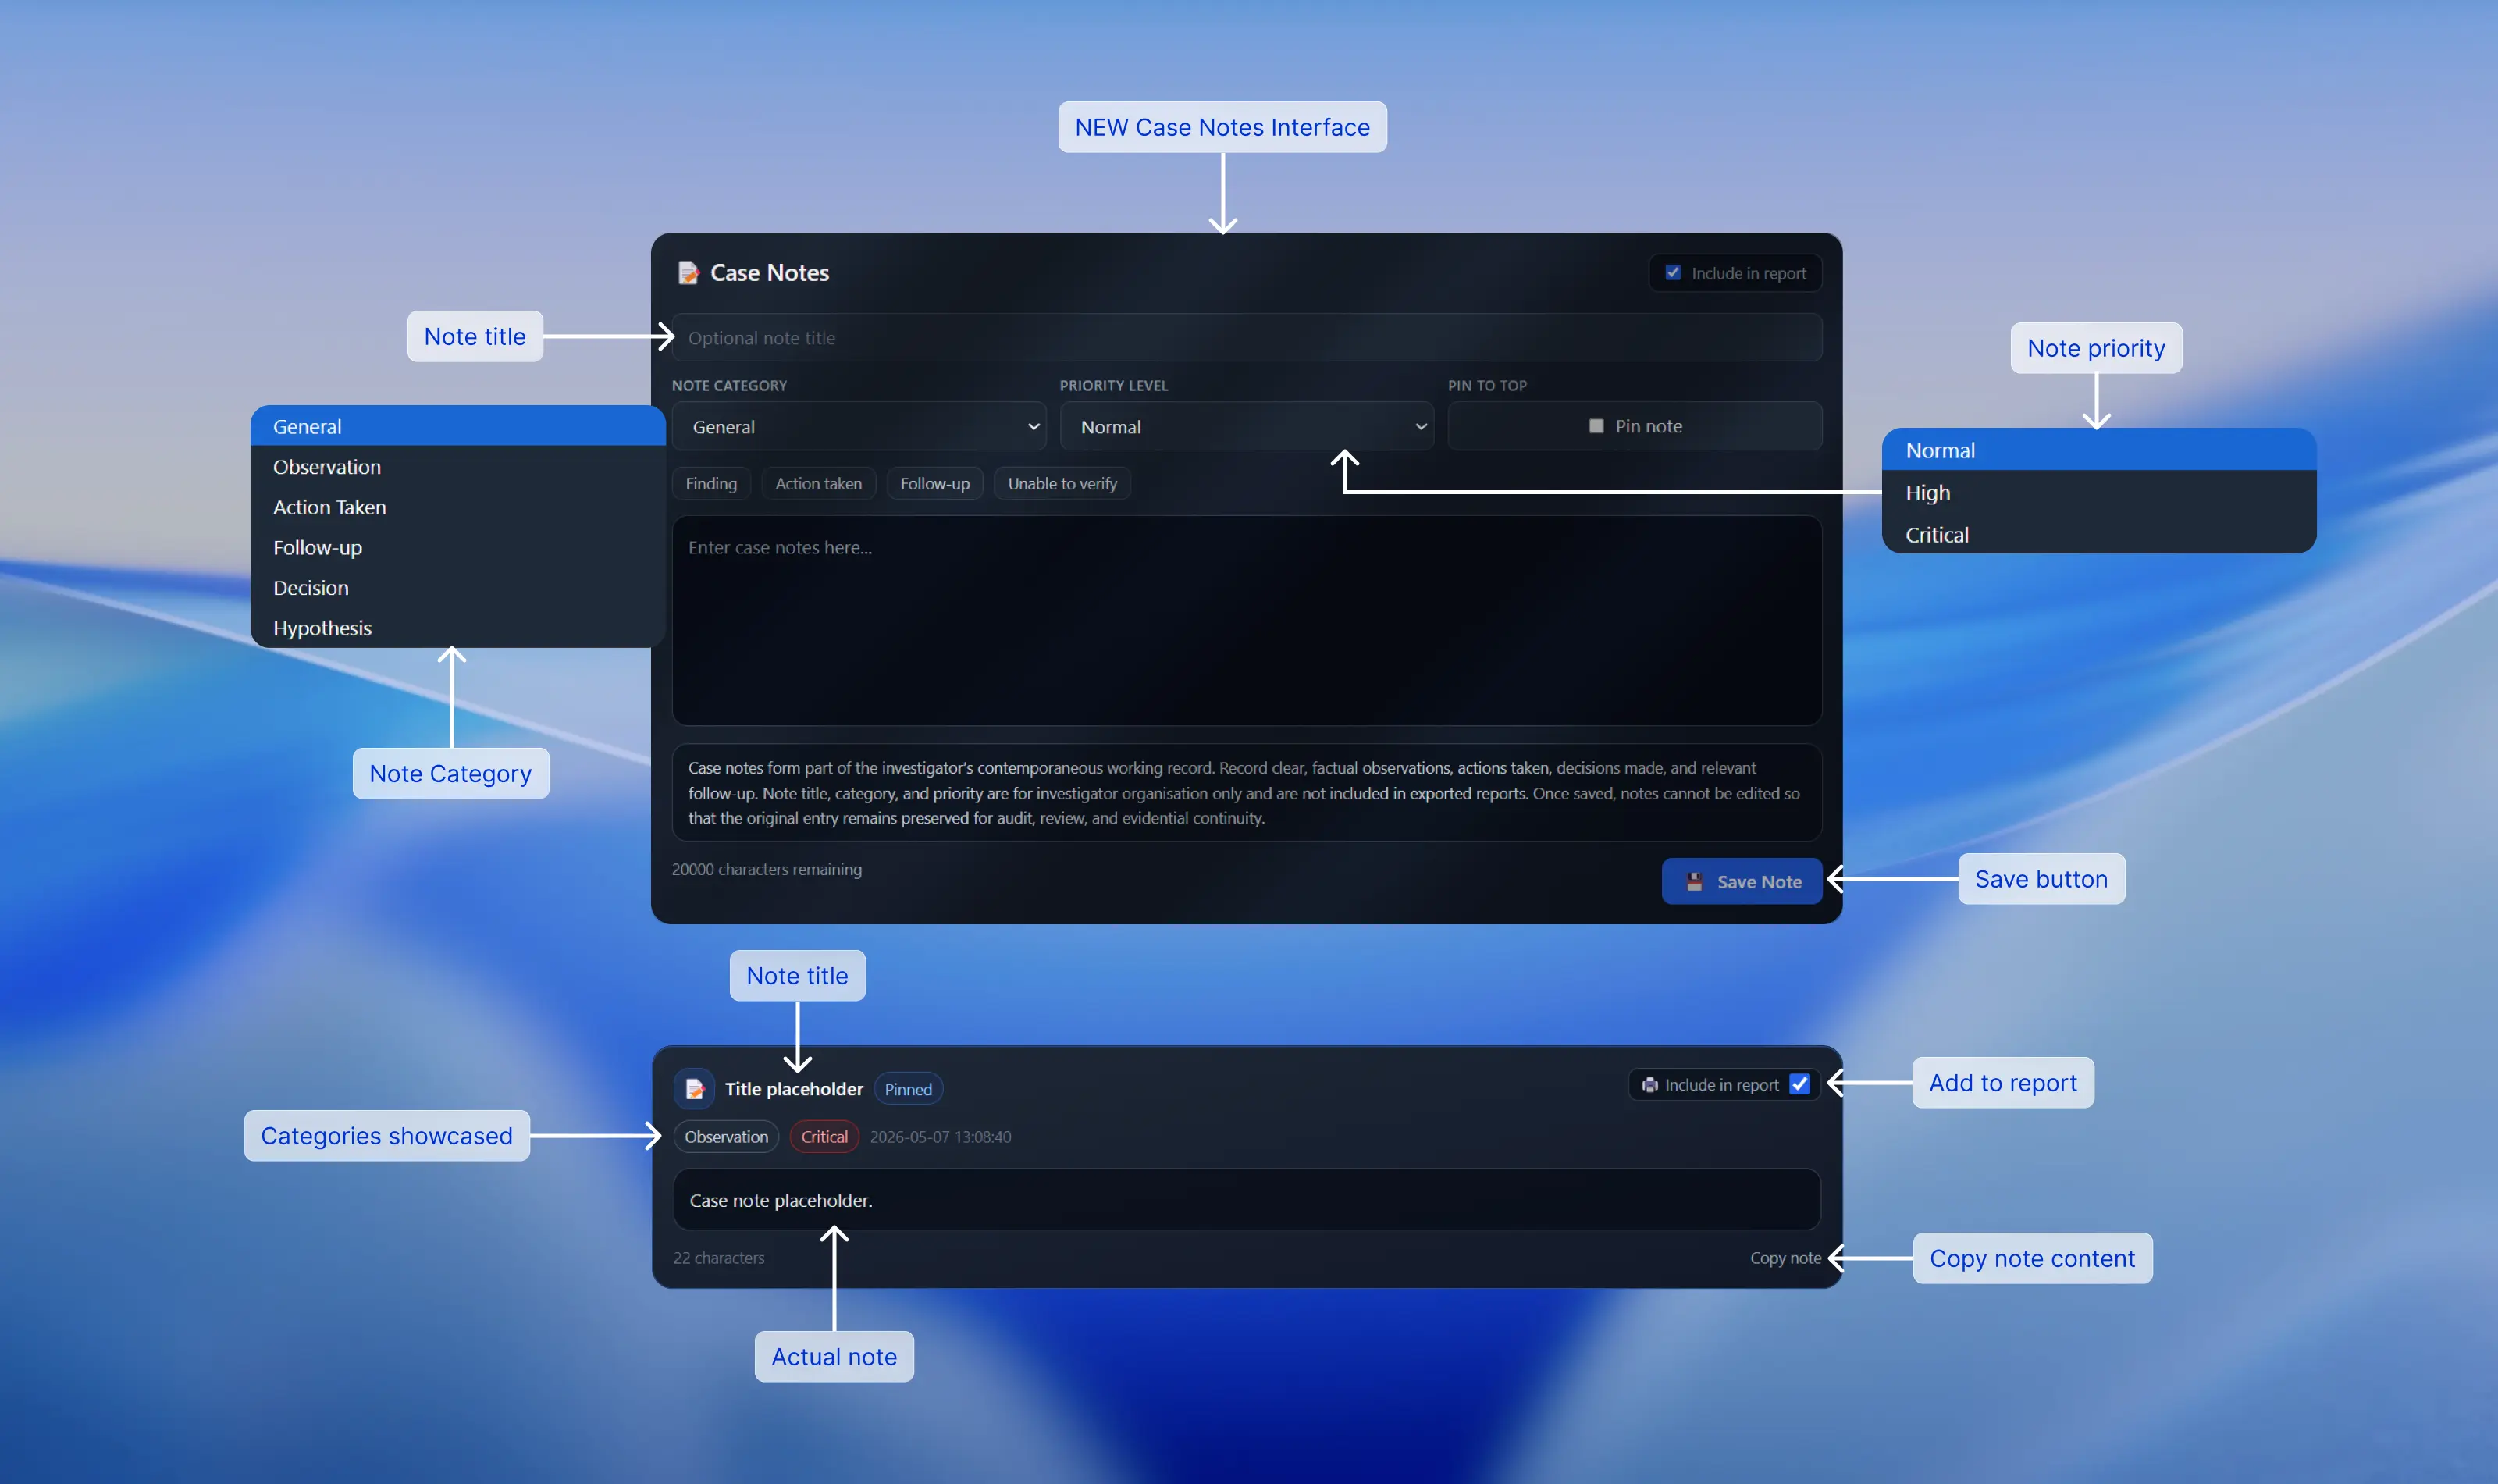
Case Notes
Case notes form part of the investigator’s contemporaneous working record.
They are used to capture observations, actions taken, decisions made, and
relevant follow-up during an investigation.
Once saved, notes cannot be edited. This helps protect the integrity of the
original record for audit, review, and evidential continuity.
Important: Saved case notes are permanent records. Check the
content carefully before saving.
Creating a Case Note
Navigate to the Case Notes tab.
Enter your note in the main text area.
Optionally add a title for your own reference.
Select a category and priority level.
Choose whether to pin the note.
Click Save Note or press
Ctrl + Enter.
Field Descriptions
Field
Description
Note Title
Optional. Used for investigator organisation only and not included
in exported reports.
Category
Helps classify the note, such as Observation, Action Taken, or
Decision. Used for filtering and organisation.
Priority Level
Indicates importance, such as Normal, High, or Critical. Used for
visual prioritisation.
Pin to Top
Pinned notes are displayed first in the list for quick access.
Include in Report
Determines whether the note content is included in exported
reports.
Quick Insert Templates
Use the template buttons, such as Finding,
Action Taken, and Follow-up, to quickly
insert structured wording into your note.
These templates help maintain consistency across investigations and reduce
the need to rewrite common note structures manually.
Finding
Use for recording something identified during review or collection.
Action Taken
Use for recording a step completed during the investigation.
Follow-up
Use for recording something that needs to be checked or completed
later.
Saving Notes
Click Save Note or press
Ctrl + Enter.
A confirmation message will appear once the note has been saved.
The note will immediately appear in the case timeline.
The note is timestamped automatically when it is saved.
Important Notes
Notes cannot be edited after saving.
Title, category, and priority are
not included in reports.
Only the note content itself is exported.
Notes are timestamped automatically.
Tips
Keep notes factual and concise.
Avoid speculation unless it is clearly marked as such.
Use categories consistently across the case.
Pin key notes, such as decisions or critical findings.
This approach helps keep your notes clear, structured, and suitable for
evidential use.
Tip: Bookmarks are a useful way to add personal notes to
individual artefacts. Use case notes for formal investigation notes, and
bookmarks for artefact-specific comments or reminders.
Customising Layout: Swapping Icons, Tabs and Cards
OSIRT iii gives you flexibility
to arrange your workspace the way you prefer. Many parts of the
interface — including sidebar icons, dashboard tabs, and evidence
cards — are swappable, meaning
you can change their order by simply dragging them.
Sidebar Icons
The icons on the left-hand side (like
Screenshot,
mOSIRT,
Dark Web, etc.) can be
rearranged to suit your workflow. Just click and drag an icon up
or down to move it to a different spot.
Dashboard Tabs
Tabs such as Captures,
Complete Log,
Screen Recordings, and others
can also be reordered. Want
“Attachments” to appear first?
Just drag it to the left.
The order will stay how you leave it, making it easier to
prioritise the sections you use most often.
Dashboard Cards (Top Row)
The top dashboard cards can also be rearranged for convenience:
Investigation Details
Alerts Triggered
Status
Capture Count
Simply click and hold on a card, then drag it left or right to
reposition it. This is useful if you want the
Status card to always appear
first, or if you want Alerts to
be more visible during active monitoring.
Pro Tip:
Tailor your layout around your workflow — placing the tools and
insights you use most often where they’re instantly accessible.
Upgrading a Legacy Case
Older cases created with previous versions of the software use an
outdated case format. While the software allows you to upgrade
these cases, we recommend doing so only if there is an absolute necessity. All new work should be created using the current
version to ensure you benefit from the newest features and most
stable structure.
Upgrading is safe and non-destructive. Your evidence files are not
changed or moved. Only the internal case structure is updated so
the case can fully operate with the latest version.
To upgrade a legacy case:
Open the software
Go to
File > Upgrade Legacy Case
Select your legacy .osr case
file
Confirm the upgrade
A new, modernised version of the case will be created for you
to use
Note:
If a case does not need upgrading, you can continue working with
it as normal. This process only needs to be completed once per
legacy case.
License Management & Moving Your License to Another Machine
Your license is tied to the machine where it was originally
activated. If you need to move your license to a new computer,
such as when upgrading your workstation or replacing hardware, the
license will need to be transferred.
To keep your license valid and avoid any activation problems,
please contact us so we can reset or reassign it for you:
Whether you are retiring the old machine or no longer have
access to it
After we reset your license, you will be able to activate it again
on your new device using the normal activation process.
If you experience any issues with your license or activation, feel
free to get in touch and we will assist you.
OSIRT iii Browser Extension
The OSIRT iii Browser Extension works alongside the OSIRT iii
Digital Casebook and Desktop Client to help you capture webpages,
screenshots, video, links, readable text and other online evidence
quickly and consistently.
Once installed and connected, the extension sends captured
material directly into your investigation workflow, helping you
preserve online content as you work.
Tip:
For full functionality, make sure the OSIRT iii Desktop Client is
open and running before using the extension.
Confirm the installation when prompted by your browser.
Pin the extension to your browser toolbar for quick access.
Open the OSIRT iii Desktop Client so the
extension can connect.
Note: This extension can be installed on any
Chromium-based browser, including Chrome,
Microsoft Edge, Brave and other browsers that support Chrome Web
Store extensions.
Placeholder image: extension icon pinned in the browser toolbar.
Extension Overview
Clicking the OSIRT iii extension icon opens the control panel.
The popup is organised into three main areas:
Screen Capturing
Page Extraction
Tools
Placeholder image: full extension popup showing all sections.
Screen Capturing
The Screen Capturing tools help you preserve visual evidence
from webpages in several ways.
Fullpage Debugger
Captures the full webpage using the browser debugger. Useful
for accurate full-page evidence collection.
Fullpage Scroll & Stitch
Automatically scrolls down a long page and stitches the
captures into a single image.
Scroll Element & Stitch
Captures a scrolling section within a page, such as a panel,
feed, or chat window.
Region Select
Lets you select a specific area of the visible page to
capture. A delay can also be set before capture.
Current View
Captures exactly what is visible in the current browser
window.
The extension can record the current browser tab as a video,
making it useful for dynamic content, live investigations,
streams, walkthroughs and changing webpages.
This feature is especially useful when static screenshots are
not enough to show movement, interaction or time-based content.
Pro feature:
Tab video recording is marked as a Pro feature in the extension
interface.
Placeholder image: Video Record Tab option highlighted.
Page Extraction
The Page Extraction tools let you preserve the underlying
content of a webpage for later review.
Page Source – captures the raw HTML source of
the page.
MHTML – saves a full archive of the webpage
for later viewing.
All Links – extracts all links found on the
page.
All readable text – captures readable on-page
text for review and searching.
The Tools section provides additional utilities to support
investigations and evidence collection.
Manage tag alerts
Save all open tab URLs
Auto Scroll page
Website tree viewer
Optional Tor connection
Placeholder image: Tools dropdown expanded.
Page Alerts
Page Alerts allow the extension to scan webpages for keywords or
tags that you define. When a match is found, the extension can
automatically perform one or more actions.
Save page source
Take a screenshot
Save as MHTML
Save all readable text
Alert you when a match is found
Matching can also be refined with case-sensitive matching and
whole-word matching.
Auto Scroll automatically moves down the page at a chosen
interval. This can help when reviewing long pages or preparing a
page for capture.
You can choose the delay between scroll steps directly in the
extension popup.
Placeholder image: Auto Scroll option and delay selector.
Website Tree Viewer
The Website Tree Viewer helps visualise the structure of a site,
making it easier to understand relationships between pages and
identify useful navigation paths.
Pro feature:
Website Tree Viewer is marked as a Pro feature in the extension
interface.
Placeholder image: Website Tree Viewer output or menu option.
Extension Troubleshooting
Extension not connected
Make sure the OSIRT iii Desktop Client is open and that any
local firewall prompts have been allowed.
Some pages cannot be captured
Certain browser-controlled pages, such as internal browser
settings pages, cannot be captured because of browser security
restrictions.
Feature appears unavailable
Some extension features are marked as Pro and may require the
relevant licence level.
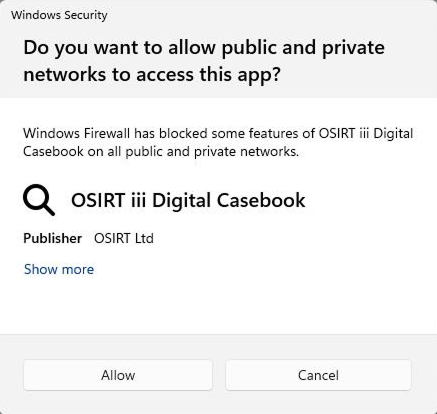
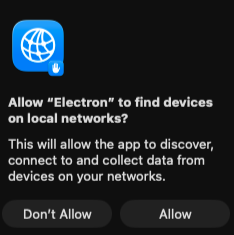


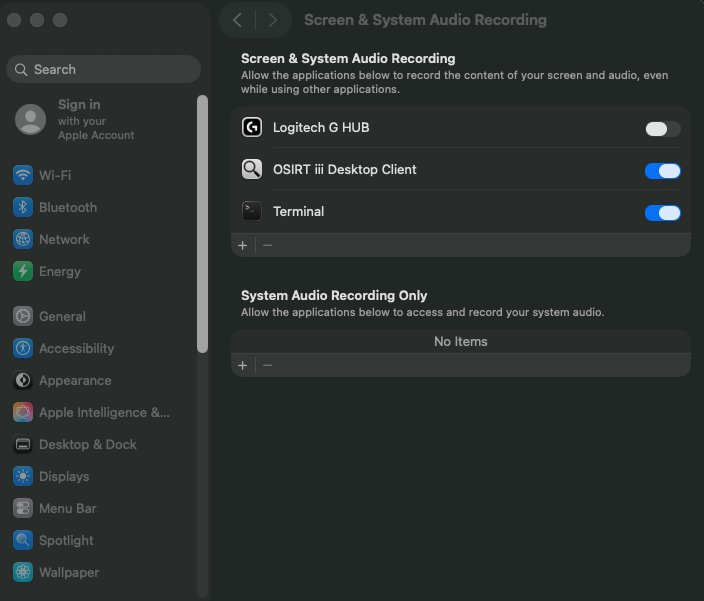
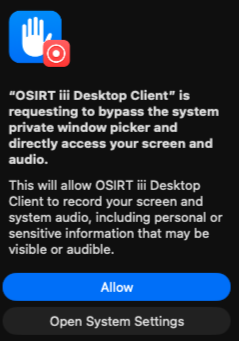
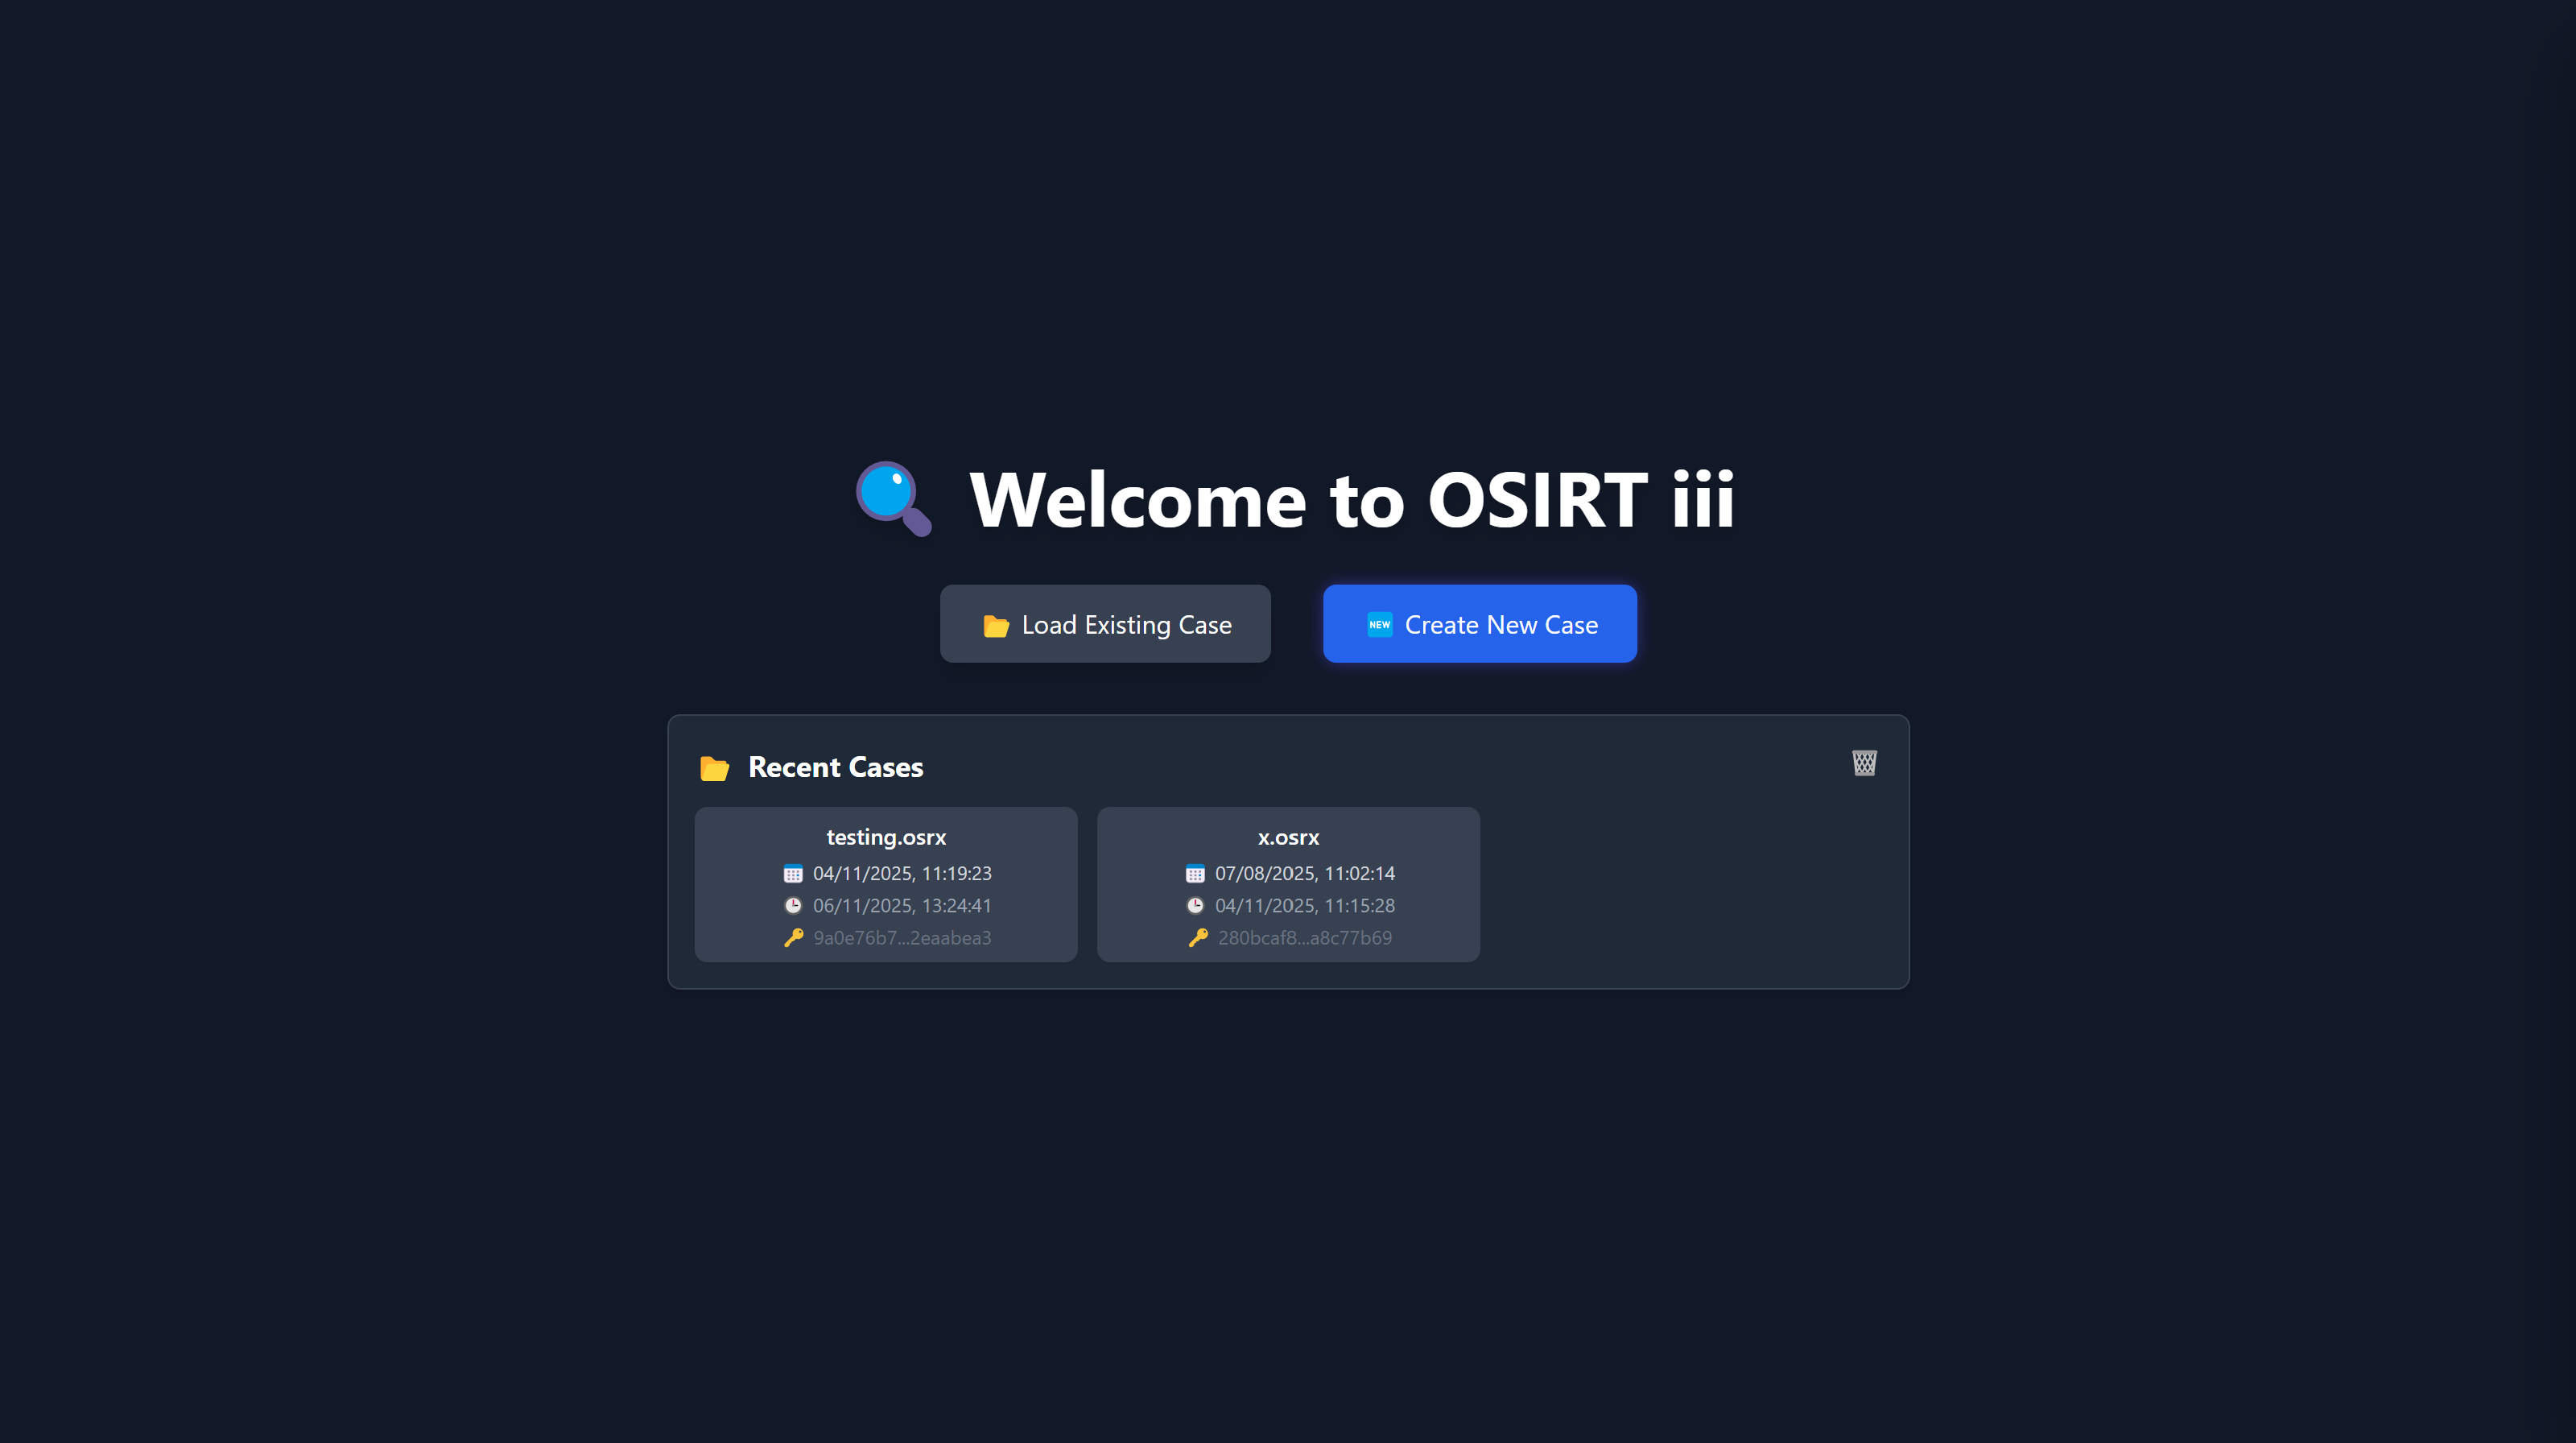

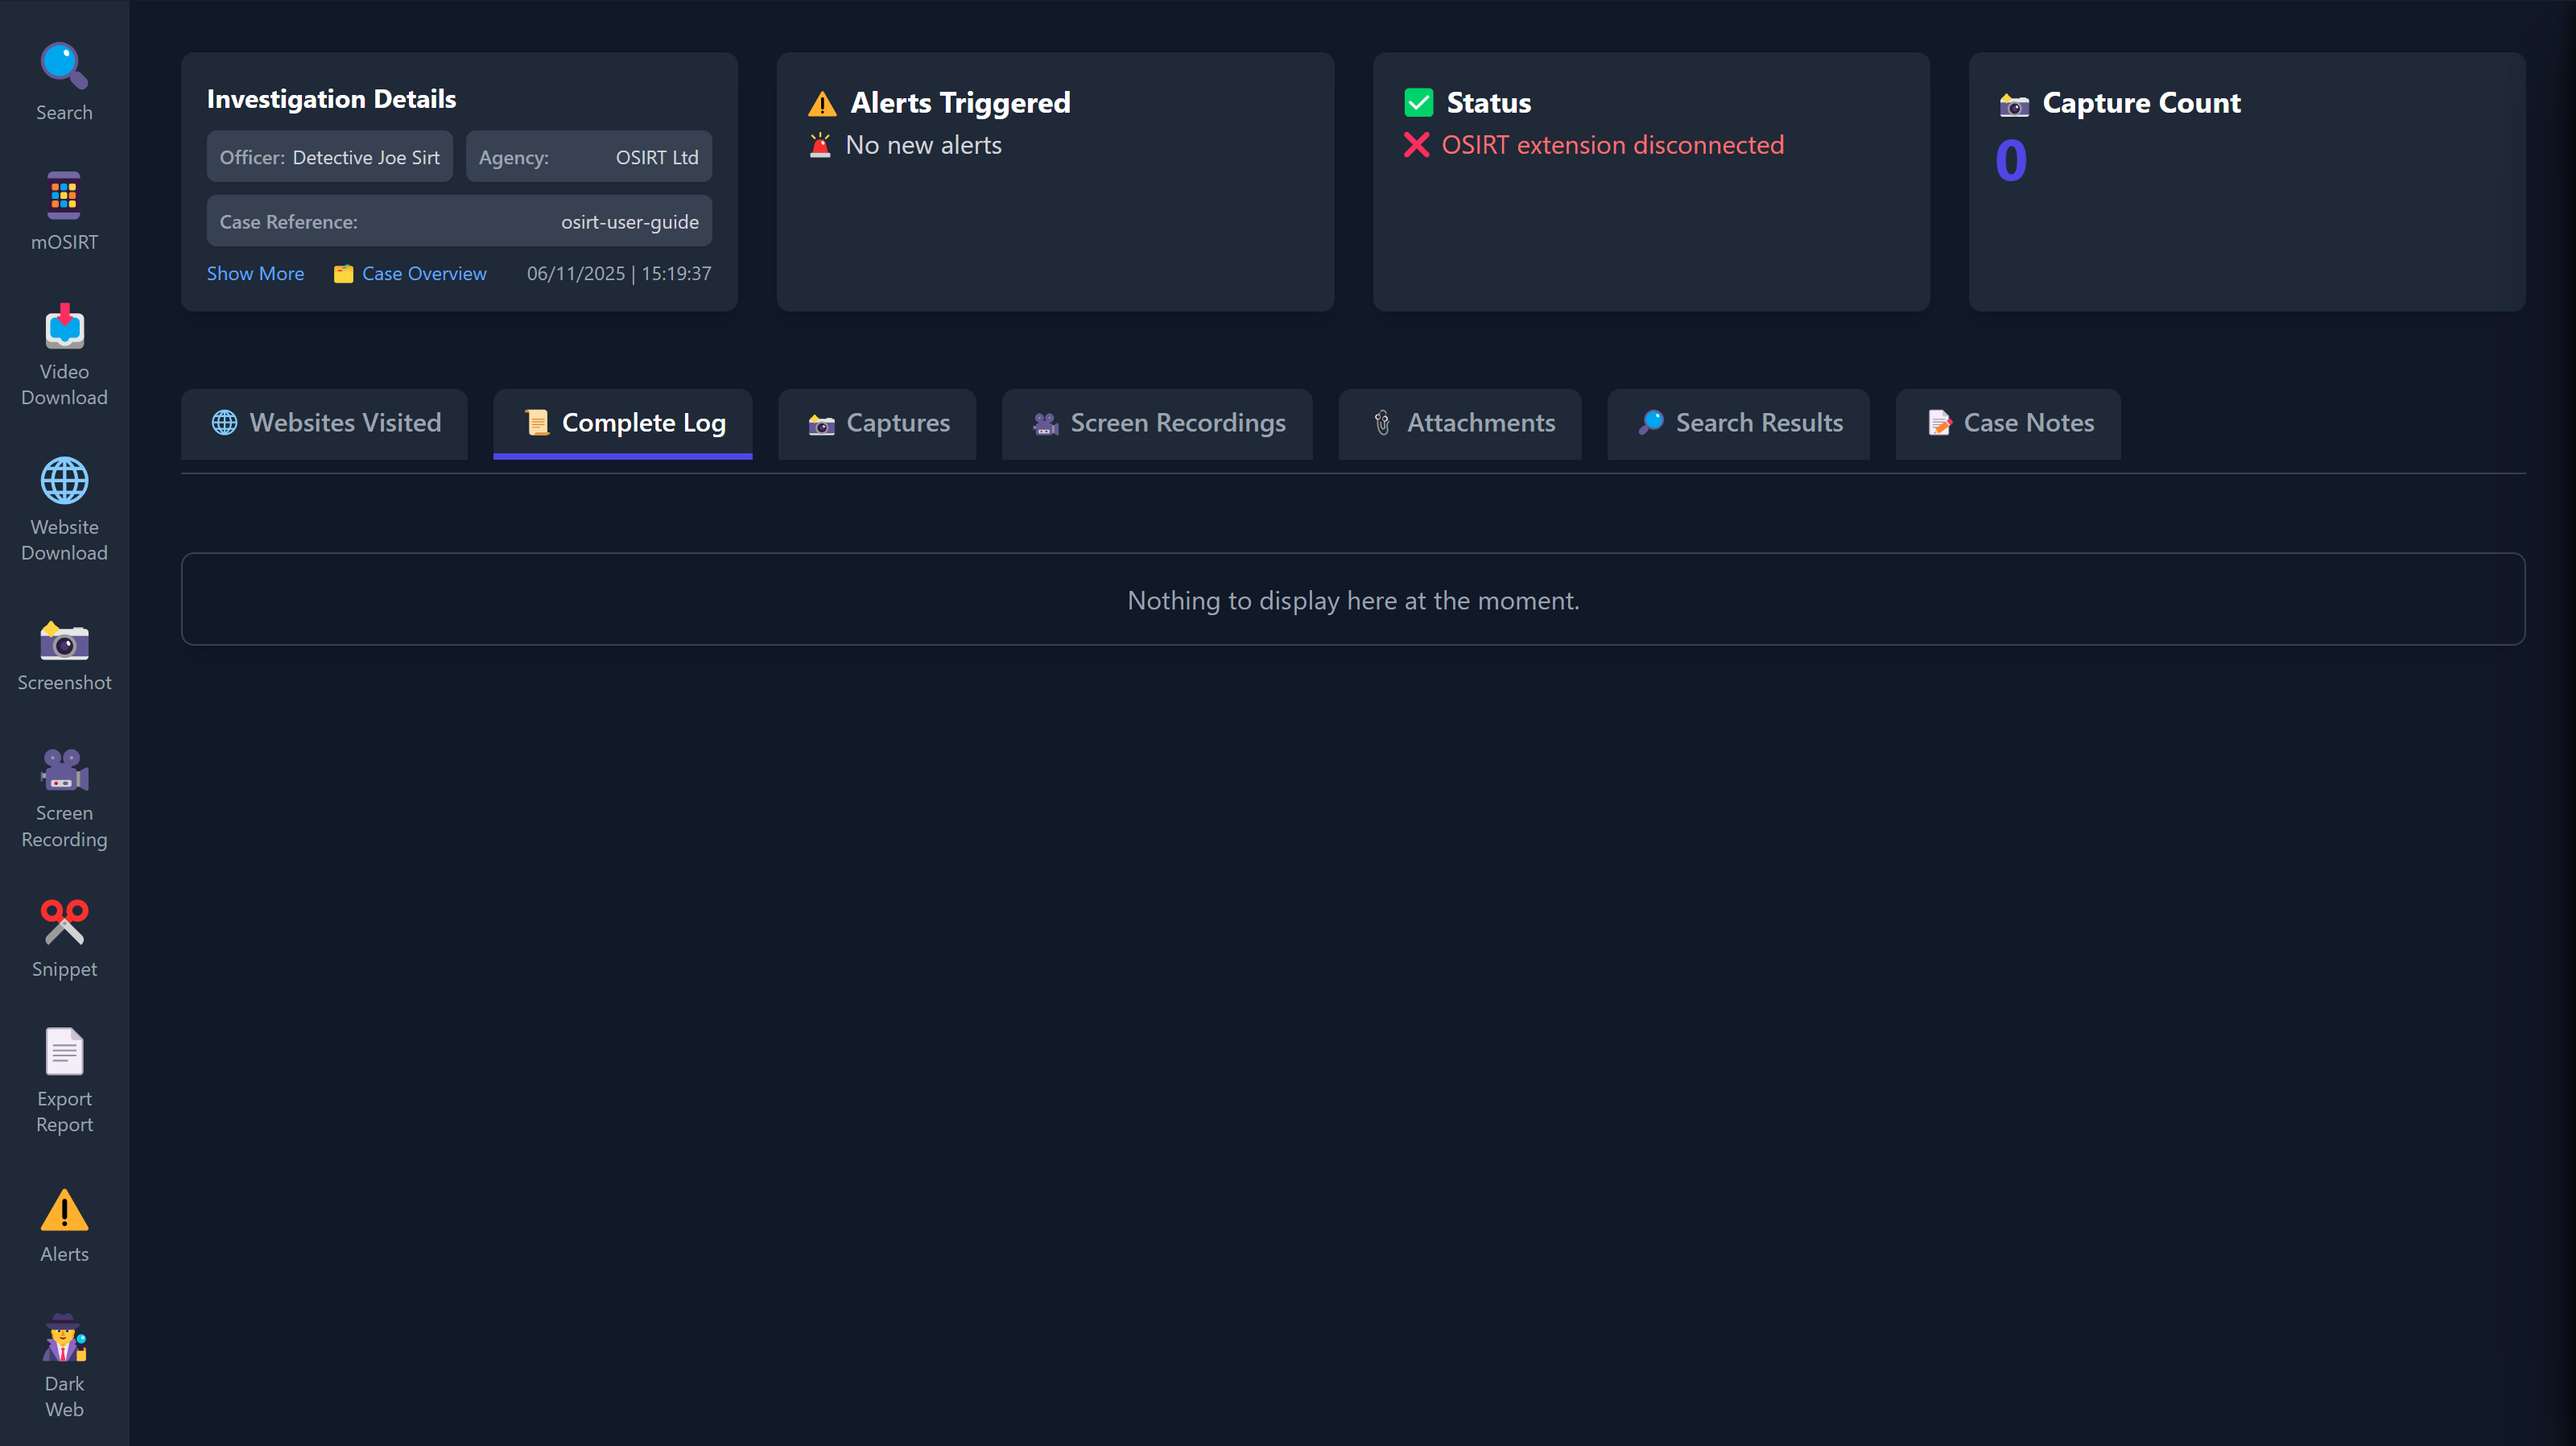 The dashboard is neatly laid out into the following key sections: